
- Fit your circular saw with a metal-cutting blade. Then, line up the blade to your cutting guideline.
- Carefully cut along the guideline using gentle pressure and a slow and steady pace.
- Use an electric drill nibbler complete rounded cuts, like cutting a hole for a vent pipe.
Marking the Metal for Cutting
Lay the roofing sheets on a flat surface with the underside up. Find a stable surface, like a workbench, you can use to cut the sheets without moving them. Flip them so the proper side faces up before you pin them in place with adjustable clamps. The underside is flatter than the top edge, making it easier to cut across. The top side of each sheet has ridges that stick up and are tricky to cut across cleanly. Always turn sheets so the ridges are upside down, valleys instead of mountains.

Calculate the number of panels needed for the roof. If you haven’t already determined how big the panel needs to be, you need roof measurements. Make an estimate by measuring the length and width of each section of your roof. You will also need to know the size of the roofing sheets available in order to fit them together. Divide the roof’s area estimate by the average size of the sheets to figure out how many you need for the project. You could look up a metal roofing calculator online to help you figure out how many sheets you need. Then, fit the sheets together according to your roof measurements. For example, if you have a 21 ft × 10 ft (6.4 m × 3.0 m) roof, you have 210 sq ft (20 m) space to cover. Divide it by an 18 sq ft (1.7 m) sheet to get an estimate of 12 sheets.

Measure along the sides to mark the spot you need to cut. Use a tape measure to plot out where you intend on beginning and ending the cut. Refer to your roofing calculations in order to determine how big the panel needs to be. Then, note the spots with a permanent marker. Focus on getting the marks precisely where you need to cut the sheet. Any gaps in the roof cause a big leakage problem, so measure twice.
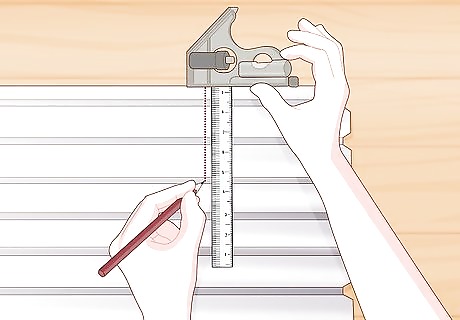
Use a combination square to draw a straight line to cut over. A combination square is basically a big ruler that attaches to the side of the sheet. Hold the adjustable part of the square flush against the edge of the sheet, then stretch the ruler part out across it. Begin connecting the start and end points with a permanent marker. Precision is very important when working with metal roofing. Any mistake you make could cause the metal to rust after you cut it. Make sure your line is as precise as possible!

Put on goggles, a dust mask, and other safety gear. Cutting metal creates a risk of metal dust and fragments. Stay safe by taking the proper safety precautions no matter what tool you use. Also, put in earplugs if you’re using a saw. Cover up with long-sleeved shirt, long pants, and a good pair of boots for additional protection. Circular saws produce the most noise and debris of any tool you can use to cut the metal. If you’re using one, double-check that the roofing is sized correctly and that you have safety gear like a good pair of earplugs and a dust mask.
Working with Tin Snips and Shears
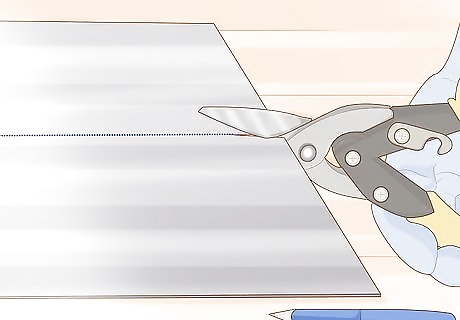
Use snips if you need to make short cuts. If you don’t mind working by hand, tin snips are an easy way to cut single sheets of metal roofing. Snips are little more than scissors for metal, so you use them like you would with scissors meant for a sheet of paper. There are several different varieties of tin snips depending on your needs. For downsides, the cutting process is a little slow and difficult to complete accurately if you have a lot to do. Select yellow or plain tin snips to cut straight lines. This type is useful for most cuts you need to make when working with metal roofing. Choose left-handed snips with red handles for cutting counterclockwise, removing metal to your left. Pick right-handed snips with green handles for cutting clockwise and removing metal to your right.
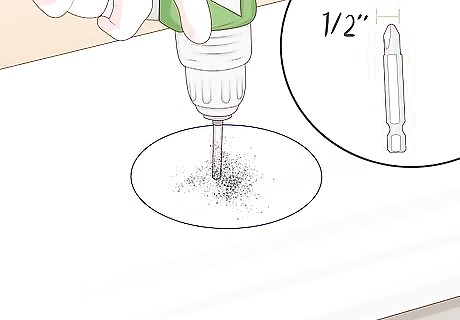
Create a pilot hole with a drill if you need a starting point. If you’re trying to cut a hole in the middle of a solid piece of metal, for instance, make a pilot hole. It is necessary when you need to cut out the middle of a roofing sheet. The easiest way to do this is with an electric drill and a ⁄2 in (1.3 cm) metal-cutting drill bit. Make the hole in the center of the part you wish to cut, then trim toward the guideline you drew. You won’t need a pilot hole if you’re cutting end to end across a sheet. Another way to do this is by hammering a nail or a screwdriver through the metal. Always make the hole on the part you plan on removing in order to avoid any lasting damage to the sheeting.
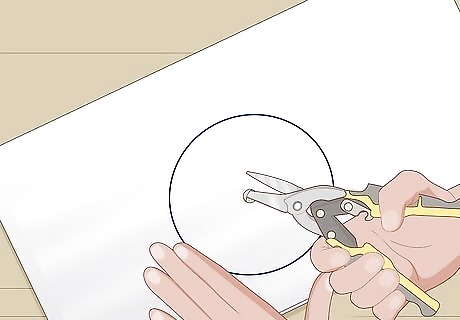
Open the snips and line up the blade with the cutting line you marked. Think of cutting the metal as a school craft project, only with bigger, sharper materials. Open the scissors as wide as you can, then fit the metal snugly between the blades. Keep the metal sheet pressed up against the jaws of the snips as much as possible as you cut. Work slowly, making sure you keep the scissors on the line and latched onto the metal.
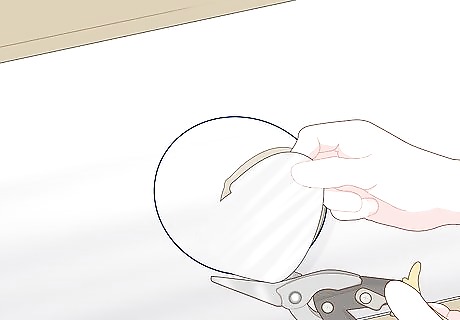
Squeeze the handles to cut the metal along the guideline. Press the jaws of the snips down as firmly as you can, then open up wide again. Repeat this until you reach the end of the metal. Get as much of the metal as you can with each stroke in order to make the cut as smooth and steady as possible. Tin snips leave jagged edges, so handle the metal carefully. Wear a strong pair of gloves to protect yourself. The snips work best when cutting shorter lengths, such as across the width of a single sheet.
Use power shears if you need to make quicker straight cuts. Power shears are very similar to tin snips but come in both electric and pneumatic varieties. If you’re cutting a length 2 ft (0.61 m) or more, shears are speedier and make for better quality cuts. Also, take advantage of power shears when you need to cut up several different sheets in a short amount of time. Shears cut similarly to scissors but are electric. All you have to do is hold the shears where you need to cut, press the trigger, and control the blade as it moves along the metal. Although quality shears slice more smoothly than a hot knife through steak, you still have to be careful with them. Sometimes they get stuck, forcing you to approach the cut from the opposite angle. As long as you don’t rush or force the shears, you won’t have much trouble.
Using a Circular Saw or a Nibbler
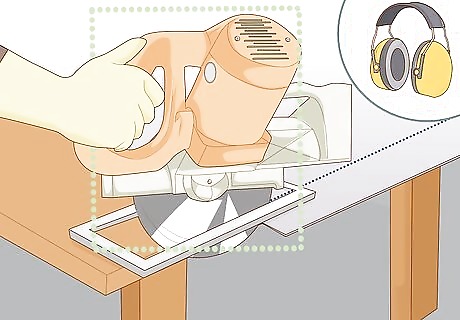
Cut with a circular saw for a quicker way to size multiple sheets. Saws are also useful for slicing through multiple pieces of roofing in one go, but a lot of safety concerns come along with them. They are very loud and can be destructive if you’re not careful. Wear earplugs and secure the metal sheeting well so the saw can’t slip out of position. Saw blades wear out over time, so replacing old blades gets a little costly if you cut a lot of metal. Saw blades get hot and can damage the roofing if you’re not cautious. They also create more dust and metal fragments that pose a risk to anyone without the proper safety gear. If you’re looking for an alternative to a circular saw, try an angle grinder. It’s more like a handheld version of a circular saw and works about as well on roofing. It is more mobile, but it requires more hand control.

Fit the saw with a metal-cutting blade. When you’re cutting metal, go for something spiky and abrasive. Steel-tooth and carbide-tooth blades are both good choices. A 7 in (18 cm) blade is the perfect size for most circular saws and projects. Select a 4 in (10 cm) if you’re using an angle grinder. Always check the blade’s label to ensure it’s right for your project. Look for blades meant to cut sheet metal or metal roofing. Carbide-tooth blades are costlier but last longer, so choose one if you plan on getting plenty of use out of your saw.

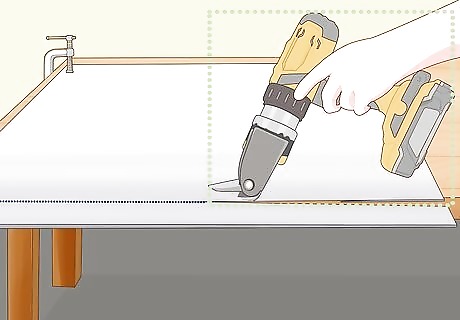
Line the blade up with the cutting guideline you marked. Once you know where to slice the metal, set the saw on the edge of it. Make sure you approach at the right angle. You only get one chance to cut it cleanly, and if the sheet shifts at all, you might fall off of the guideline. Unlike with tin snips, you don’t get a second chance to adjust, so keep a close eye on the blade. Move slowly, keeping your hands firmly placed on the saw’s guard at all times.

Cut along the guideline at a slow and steady pace. Saw blades cut through metal sheets at a fairly rapid rate. However, rushing is still risky. Hold the saw with a gentle amount of pressure, enough to control it and keep it positioned on the line. Push it forward along the metal to complete the cut. If the saw stops working, don’t force it forward. Turn it off and take it to the other side of the guideline. Complete the cut from that angle to create a secure but whole panel for your roof.
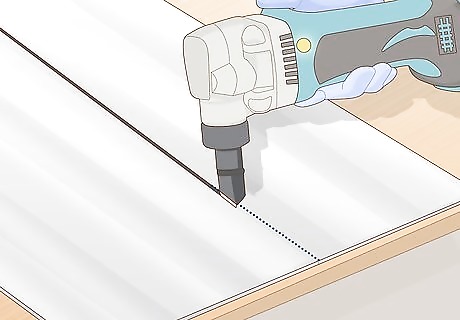
Get an electric drill nibbler to complete rounded cuts. Using a nibbler is similar to using a saw, but it is a much better way to complete specialty cuts. You can get a separate tool or an attachment that fits on an electric drill. Like the name suggests, it takes small rabbit bites out of the metal. Starting at the edge of the roofing sheet, push the nibbler forward along the guideline you drew to complete the cut. Nibblers are specialty tools, so they aren’t great for straight cuts. Fortunately, you have your saw for that. Use a nibbler instead for tasks like cutting a hole for a vent pipe.


Comments
0 comment