
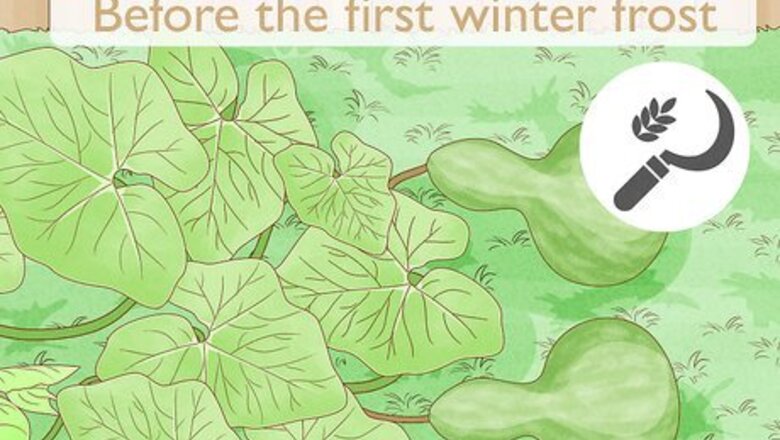
Harvesting Your Gourds

Harvest the gourds when the stems are brown and brittle. Just before the first winter frost, examine your gourds to see if they are ready to cut from the vine. Your gourds are ready when their stems look brown and shriveled and feel brittle and dry. Underripe gourds will start to rot within a few days, so you want to wait for them to fully ripen. Overripe gourds will already show soft spots while on the vine. Avoid them, because there's no keeping them from rotting.

Cut the gourds from the vine. Once the stems are brown and brittle, cut your gourds off the vine with garden shears or a sharp knife. Make sure to leave around 3 inches (7.6 cm) of stem so that your gourds are less prone to rot.

Wash the gourds and pat them dry. Use soapy water and a cloth to remove any dirt and debris, carefully pat the gourds dry, and then wipe them down one more time with a cloth soaked with rubbing alcohol.
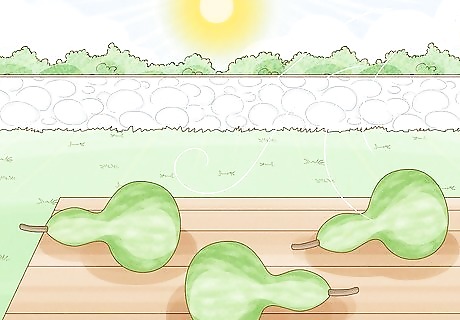
Spread out your gourds in the sun. Find a sunny spot and arrange the gourds on a bench or picnic table (not on the ground). Space them far enough away from each other that they don’t touch and air can freely circulate between them. Leave the gourds in the sun for up to a week before you move them indoors. Turn the gourds once a day to make sure air reaches all sides of the gourd. Alternatively, hang your gourds by tying a string tightly around the stem of each gourd and tie the other end to a clothesline. Hanging your gourds eliminates the need to turn them every day.
Curing the Gourds in a Warm, Dry Location

Bring the gourds indoors. Choose a dry, warm spot to hang or spread out your gourds. Good spots could include a shelf or workbench in your garage or over a radiator or next to a heating vent in your home. Avoid storing the gourds in a damp or chilly space like your basement.

Spread the gourds out so that air can circulate. You could hang your gourds from a hook or a string or wire you've nailed into your wall, or you could spread out your gourds on sheets of newspaper and leave 1 inch (2.5 cm) or so of space between them.

Turn the gourds every couple of days. If you're storing your gourds on a flat surface, you’ll need to turn them regularly so that they dry evenly. You don't want the side the gourd is sitting on to miss out on airflow, so you should rotate each gourd by hand to prevent rotting.
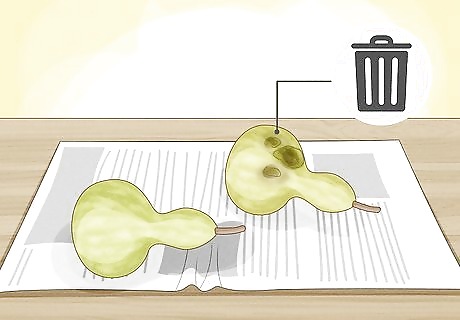
Look for mold and rot. Signs of rot include mushy spots or seeping fluid. You'll want to act quickly to remove the rotten gourd from your collection. Mold, on the other hand, can show up in white, gray, or black patches that are dry and flaky rather than mushy like rot. Mold is a natural part of the drying process, so a moldy gourd can be cleaned rather than discarded. If you see any rotten, mushy spots on one of your gourds, you should promptly remove it and discard it. That way you won’t risk the rot spreading to the other gourds. If you see patches of gray, black, or white mold, you can spray the gourds with a solution of 1 part bleach to 10 parts water, then wipe away the mold with a cloth.
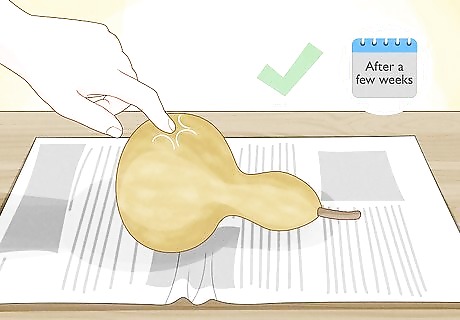
Test to see if the gourds are fully dry. Drying these gourds can be a long process, so you want to test them after a few weeks to see if they're fully cured. Gently press the gourds with your fingertips. When the gourds are fully dried, they will feel hard and dry, rather than soft and pliable. Some people will tell you to scratch your gourds with your fingernail to test if they are dried and cured, but this risks bruising or marring your gourds and making a hole that could let bacteria or bugs get in. Once the gourds feel dry to the touch, you can shake the gourds and listen for the telltale rattle of seeds that lets you know the gourds are finally dry. Once your gourds sound a little like the maracas, you’ll know they’re ready to paint and prepare.
Finishing and Hanging Your Dried Birdhouse Gourds
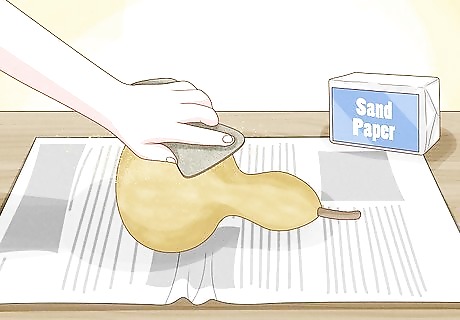
Remove the rough spots. To make your gourds look their finest, use a fine-grit sandpaper to smooth out any bumpy or scaly patches on your gourds. Sand with a gentle touch in a slow back-and-forth motion to avoid damaging the gourd.
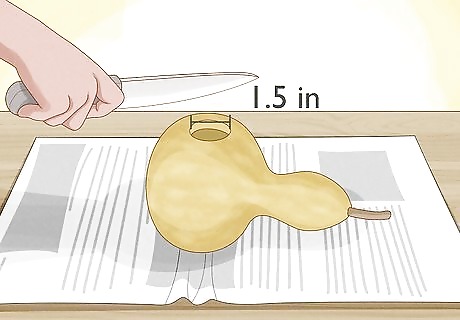
Cut the birdhouse hole. Use a knife, drill, or jack-o-lantern carver to puncture the gourd. Then saw out an opening big enough for a bird to use to enter the new house you’ve created. The size of hole will depend on the size of the birds in your yard. The hole should be: 1 in (2.5 cm) for house wrens 1.25 in (3.2 cm) for chickadees 1.5 in (3.8 cm) for bluebirds or swallows.

Drill holes for hanging and drainage. You'll need to drill holes in the top of your birdhouse gourd to insert a string or wire for hanging the birdhouse, as well as a small hole in the gourd's bottom so that rainwater can drain out. Drill two .125 in (0.32 cm) holes directly across from each other at the top of your gourd, about 1 inch (2.5 cm) below the base of the stem. Run a 6 in (15 cm) wire or string through these holes and tie the ends together so that you can hang your birdhouse from a tree branch. Drill a .25 in (0.64 cm) drainage hole in the bottom of your gourd to allow rainwater to drain rather than accumulate and lead to rot.
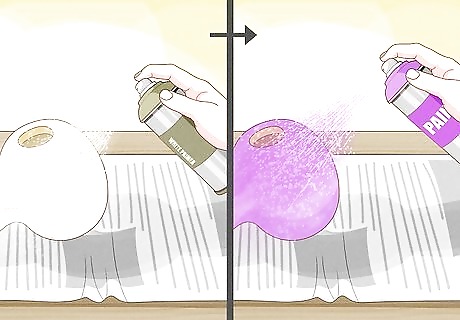
Decorate the gourds. First, spread the dried gourds out on newspaper and spray paint them with a white primer, making sure to fully cover every side. Then, spray paint them whatever colors you like, or use a pencil to sketch your design onto the gourd before you paint on your design with a brush and acrylic paints.
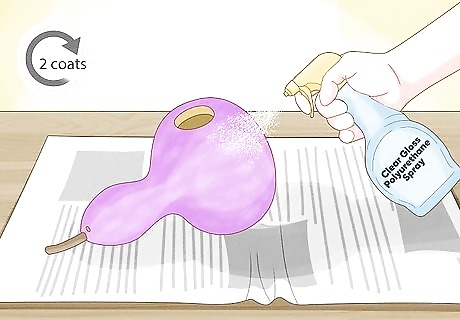
Seal the gourds. To keep your gourds looking their best, finish the process by spraying on a few coats of polyurethane spray paint to seal them and protect them from the elements. Spray a clear gloss polyurethane, wait for it to dry, then spray a second coat for good measure.


Comments
0 comment