
Making an Antique Wooden Sign
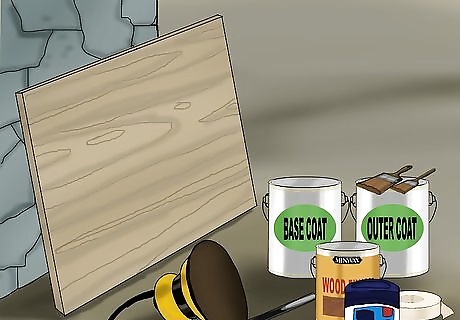
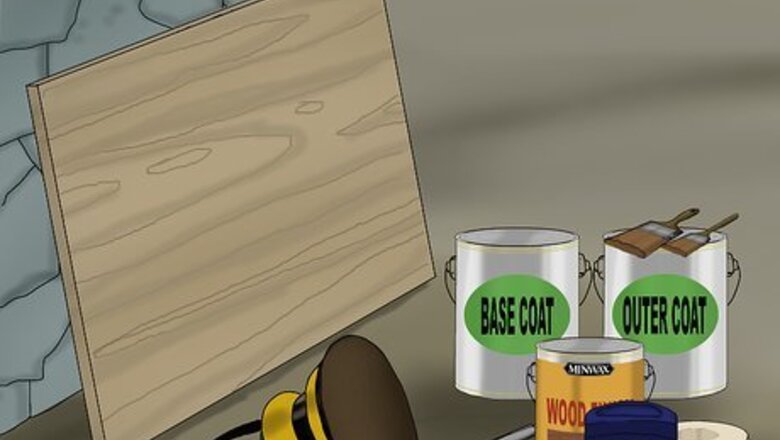
Find and buy your materials. The most important thing you will need is a large piece of plywood. The size of the sign all depends on how far away your customers will be when they see it. If you are far away from the road, or the main entrance into the plaza, you might want to get a larger piece of plywood. Either way, stick with one that is at least 2 by 3 feet (0.61 m × 0.91 m). Here are some other materials you will need: Base coat. Because the wooden sign will look "antique," the base coat will show through to outer coat of paint. This means that the base coat should be a different, high contrast color as compared to the outer coat of paint. Pick the color you want the base coat to be, and buy it at your local hardware store. You will want to buy acrylic paint. Outer coat. Once more, you want a high contrast color compared to your base coat. Electric sander Large and small paintbrushes Vaseline Tape Ballpoint pen Minwax Steel wool

Sand your piece of wood. You will want the piece of wood to be wide enough so that people can see the sign from far away, but thin enough so that it is easy to hang. Use a piece of sandpaper, or an electric sander, and go around the whole board. Sand the board in small circular motions, taking off the excess bumps and chips. Make sure to get the edges as well. Do this until the board is smooth to the touch.
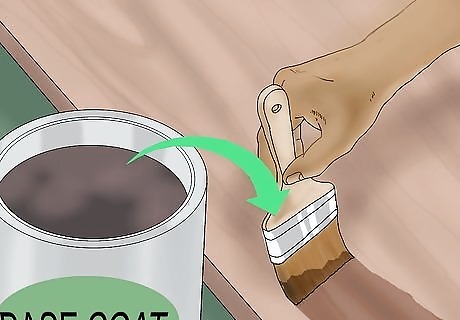
Paint the base coat of your sign. Mix your paint when you get it home. Use a medium sized brush, not a roller, to paint your board. Work in left to right motions, always working with the grain of the board. Make sure to do this outside so that the fumes from the paint don't build up. You may want to use a pair of gloves as well. Wear an old t-shirt when you paint so you don't mess up your nice clothes.
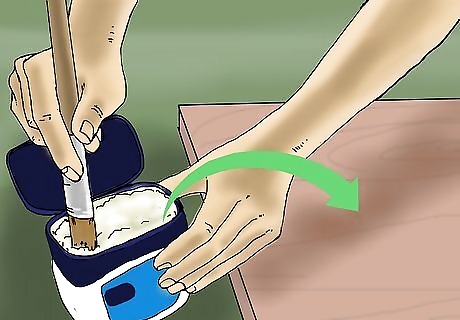
Add Vaseline to your wooden sign. You want the base color to show through after you paint the top coat. Adding Vaseline will make it very easy to remove chips off the top coat. After the bottom coat dries, apply the Vaseline wherever you want to, but focus on edges and sides. Don't put on large smear marks, but merely 1-2 inch long marks that are skinny. Make sure to leave the vaseline on the board as you begin to paint the next coat.
Paint on the top coat. This coat should be in sharp contrast to the bottom coat. For instance, use a green top coat, and a red bottom coat. Buy the paint at your local hardware store and mix it at home. Use a medium sized brush and paint from left to right. It's okay if some of the Vaseline smears as you paint on the coat. Do this outside so that the fumes from the paint don't build up. Wear some gloves when you paint, as well as an old t-shirt.

Create a stencil for your lettering. Use a word processing program such as Microsoft Word, or Google Docs. Set the orientation to "landscape" and adjust the font size accordingly, depending on the size of your sign. Print out the sheets of paper on your home printer. Place them over the top of the board to see if the size is correct. You may have to reprint the letters using a different size and font. If you are artistically inclined, you can paint the letters on by hand.
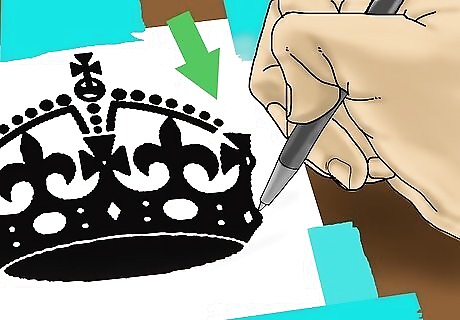
Trace your lettering onto the board. Tape the printed out lettered sheets onto the board using blue painter's tape. Make sure that the design is centered the way you like. Use a ballpoint pen and trace over the letters. Press down with some pressure, so the design transfers onto the board. Once you are done tracing, remove the papers and throw them away.
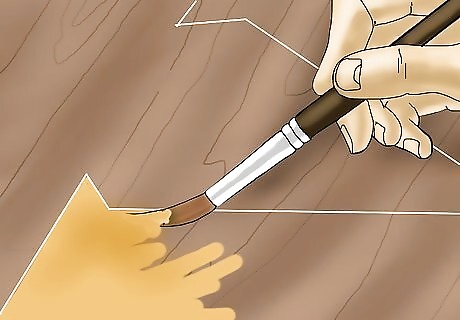
Paint your letters. Use an acrylic paint and go over the outline you just created. You can paint inside of the letters as well, using a small paint brush. This would also be a great time to add any miscellaneous designs you want, like vines, swirls, or different shapes. You will want to use a color that is different from both the base and top coats. White is the best option if your other two coats are darker. If the bottom coats are lighter, use black, or dark brown.
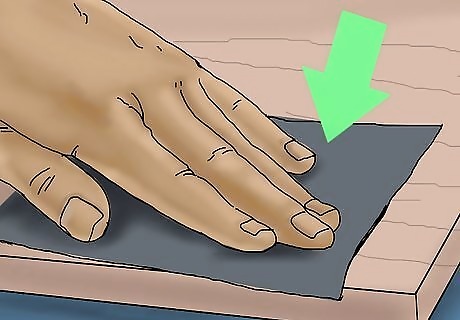
Bring your bottom coat to the forefront. Take a piece of sandpaper or steel wool, and gently brush over the top of the board. Do this after the paint from all three coats are dry. You do not want to press too hard, otherwise you could wind up taking too much of the top coat off. With the Vaseline underneath, the paint will come off very easily. Focus on the areas you remember putting the Vaseline at.
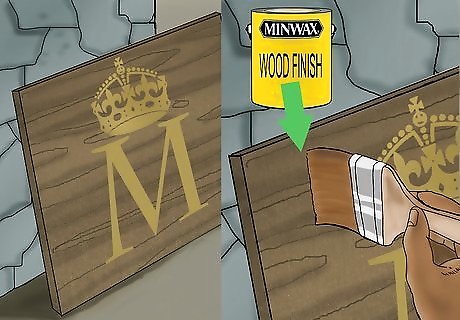
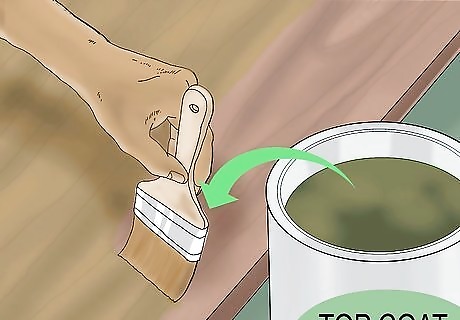
Wax the final project. In order to keep your sign safe from weather conditions, you will need to wax it. Use a furniture wax like Minwax, or any other brand that you find at your local hardware store. After you open the can, take a medium sized brush and dip it in, taking small amounts of wax at a time. Work from left to right, using small strokes, always in line with the grain of the wood. Make sure to get the sides and edges, as well as the front. After the wax dries, you may want to add another coat, depending on how well you coated the board the first time. Every year or so consider applying another layer of wax to keep your board safe.
Crafting a Wooden Marquee Sign

Find and buy your materials. The most important things to pick up are big wooden letters. These can be found at most arts and crafts stores. They are usually around 12-18 inches tall and cost around eight dollars a piece. You can also use paper mache letters, but they will not withstand outside weather conditions like wood can. You will want to get all the letters of your business name, or the slogan you use. You can also get letters to create phrases, such as "Ten Percent Off" or "Buy One Get One." Here are some other materials you will need: Acrylic paint of your choosing Large and small paintbrushes 3-4 plastic place mats Scissors Spray paint primer Silver spray paint Electric drill Pencil Stringed bulb lights Super glue Nails Cork board

Paint your letters the color you want. Buy some acrylic paint from your nearby hardware store. Stir the paint when you get home, and apply it with a medium sized brush. Go from right to left, left to right, always with the grain of the wood. Make sure you get both the front of the letters and the sides. You will want to do this outside so the fumes don't build up. Make sure you are wearing gloves and an old t-shirt as you paint. You can create a "vintage" look by dabbing on darker colors to the edges. Use a small piece of foam and dab it in the dark paint. Gently press and rub it around the edges of your wood.
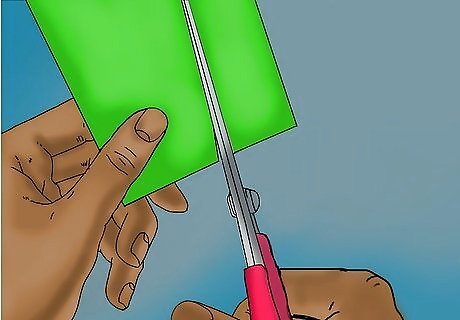
Cut out plastic strips. You will want to buy a few plastic place mats. Measure, with a ruler, every 2 inches and make a mark on the short side of the place mat. Use scissors to cut out the 2 inch wide strips, going longways. If you want to, you can take a piece of sandpaper or steel wool, and run down the edges of your plastic strips. This will smooth them out, and make them soft to the touch.
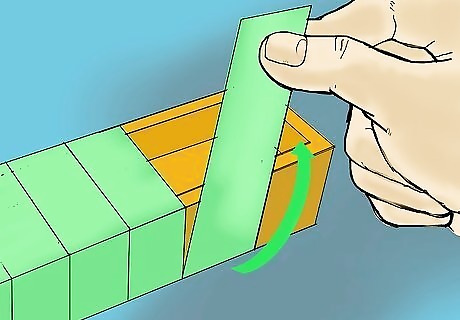
Wrap the strips around your letters. This is not the step where you attach the strips to your letters. You first need to get the form of the letters. Take one strip and wrap it around one of the edges of your letters. Press firmly so that all the curves and corners form in your strip. Make a mark with a pencil where that strip ended and place that strip to the side. Grab another strip, and start about 1/2 inch before that mark. Continue until each of your strips has been formed. When you set the strips to the side, let them stay in the bended positions. Remember which strip goes where.

Spray paint the plastic strips. You will first want to spray the plastic pieces with a spray primer. Then, once the primer is dry, paint on a black bottom layer of spray paint. Move the can left to right as you hold down the nozzle. Make sure to get the entire surface area, as well as the edges. Then get a can of silver spray paint. Hold the can as far away as possible, and lightly spray the pieces. You just want the plastic strips to get a light coating of silver spray paint. In between the primer, black, and silver coats, wait for the plastic strips to dry completely. Do this outside so that the fumes don't build up, and so you don't get paint everywhere. You might want to wear gloves and goggles when you are spray painting.

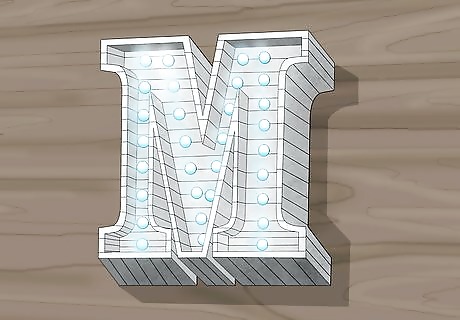
Drill holes into your wooden letters. Decide on where, and how many, holes you want. For an 18 inch letter, you will want about 10 holes. The important thing is that the holes are equidistant from one another, and are centered along the width of the letters. Mark where you want each hole with a light pencil mark. Drill each mark, all the way through. Wipe away any excess sawdust with a soft cloth. Make sure the drill bit you use is at least the size of the largest part of the light socket. When you insert the lights later on, you want to make sure they fit into the holes. Determine the number of holes you want by how many lights you have available. If you only have a few, do fewer holes in each letter. Remember, you will need a relatively high number of bulbs to create the effect of the marquee sign.

Glue your strips to the letters. Wipe down the edges of your letters with a clean cloth. Put a consistent strip of super glue on one section of a letter. Take the respective plastic strip and press it to the letter. Wait 15 seconds before you release it. Make sure that you are applying pressure equally to the entire strip. Continue on, until all of the strips have been glued on. There will be some overlapping, depending on how much you overlapped when you originally bent the strips. If you notice the strips are already coming off in certain areas, apply a few drops of super glue behind the loose areas. Reapply pressure for another 15 seconds.

Insert the light sockets. You will want to buy at least two sets of globe string lights, available at most local hardware, and arts and crafts stores. Take the lightbulbs out, leaving just the string of sockets. Insert them from the back, starting with your first letter. As you are inserting each socket, apply a small amount of duct tape, or electrical tape, to the back of each socket. This will keep the sockets from popping out. When you run out of one line of sockets, simply attach the next line and continue on. Once you have finished putting in the sockets, go ahead and attach the bulbs on the front side of your sign. This will give your sockets some extra security as well.
Attach the letters and hang your sign. You can use a peg board, a cork board, or just a regular piece of wood. Lay your letters onto the board to determine where you will need nails. Insert them into the peg/cork boards, or hammer them into the piece of wood. Now just plug in your socket lines, hang your sign up, and it's ready to go.
Creating a Vinyl Sign
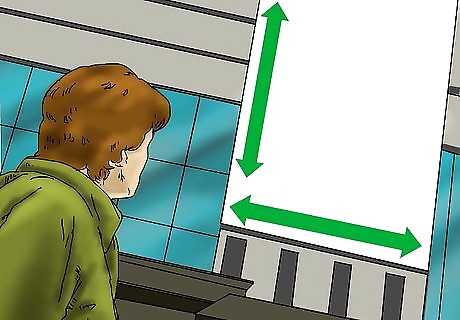
Determine the dimensions of your sign. Measure the distance from which your audience will be viewing your sign. Go to certain spots where people pass by, and notice how much you can see from that distance. Scout out other business signs in the nearby area to see how large they are making their signs. If you are a store far away from the road, you might want to make the sign larger, and vice versa. Make the text and any graphics on your sign large enough people can read them from a distance.

Open up a word document. In order to make a vinyl sign, you will need to have a word processor, like Microsoft Word or Google Docs. You will want to change the orientation of the document to "landscape." If your word processor has specific functions as a sign maker, you can use that as well. There are also numerous websites online which have programs specifically designed for making signs. Remember that you will not be able to print these signs at home. So, if you use an online website to create your design, you will have to save it to your computer. Make sure to buy a USB flash drive. That way when you have the design saved to your computer, you can transfer it to the USB and take it in to your nearest printing business.
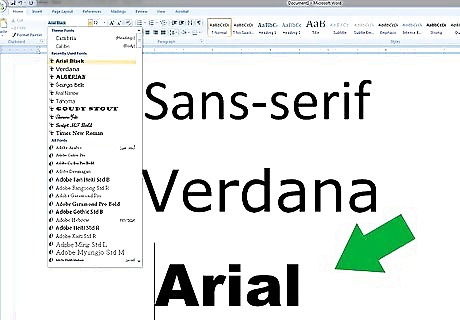
Utilize simple fonts. Sans-serif fonts are good choices, such as Helvetica, Arial or Verdana. They are clear fonts that don't incorporate extra curves or decorative aspects to the letters. Some sign makers incorporate several fonts into their signs. That's a good idea as long as you use the fonts to emphasize specific points or copy on the sign. It is not advised to use more than three fonts on your sign. In order to break up your text, feel free to include italics, bold and underlines in your copy.

Use contrasting colors. When light and dark colors are used next to each other, it creates an attention-drawing image that not only is pleasing to the eye, but is also easy to read. For instance, white and black is the most obvious light/dark color combination, but other combinations include orange/blue, gray/red or cream/dark green. While using contrasting colors for your sign, attempt to stay true to your organization's logo.
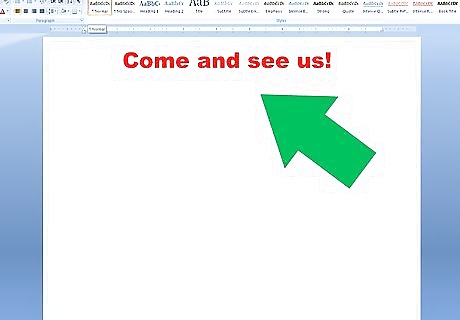
Call to action to your target audience. Use action verbs within your phrases and headlines. Your copy should direct the reader or tell the reader what to do. Examples are "Come see us!" or "Buy now!" If you are attempting to target a younger audience, use slang, or shorter words. Adult audiences prefer larger words and a more sophisticated vocabulary.

Start your message at the top of the sign. Remember that viewers read your sign from top to bottom. The most important information should be toward the top of your sign in order for your reader to absorb it. If words are randomly placed throughout the sign, it may be hard for your audience to read it. The name of your business should also be included in the message. In case your audience can't make it into the store, you want them to know what to search for online.
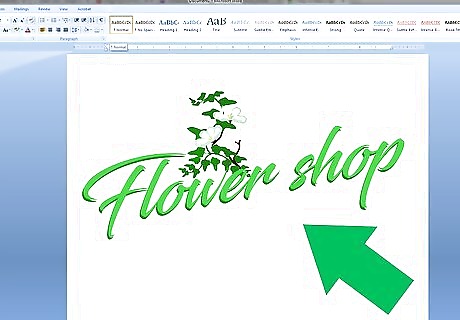
Use pictures and graphics on your sign. Do this for a specific reason. Don't just interject them for fun or because you like them. They should help fill in space, tell something about your business or product, and help viewers understand your message. For example, if you are a flower shop, include vines to underline words, and place flowers within some of your letters. If you have a business logo, this would be the time to add it in. Remember, the simpler the better. You do not want to clutter your sign with pictures.

Direct customers with your sign. Tell them how to get to your location or how to contact you (email, phone number, etc.) You might also want to include, in smaller print, the hours your business is open. An arrow also helps lead your potential customers in the appropriate direction. If this sign winds up being miles away from the actual store, include the number of miles it will take to get there.
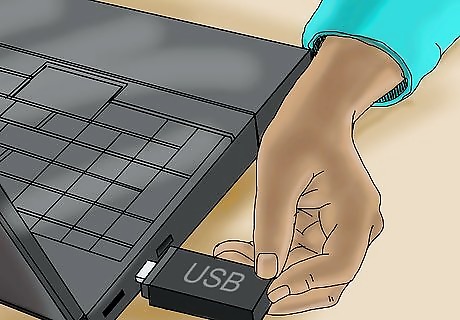
Save the document to a flash drive. Go to "File" and click "Save." Plug in your flash drive to the USB port on your computer. You then want to go to your list of files on your computer, and find the saved document. Click and drag it over to where it says the name of your flash drive. Simply let go, and the file will download onto your flash drive. Click "Eject" and then safely remove the flash drive from the USB port.
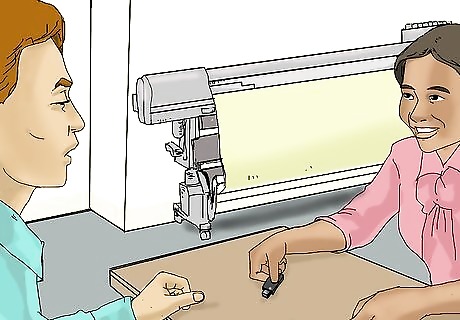
Take the document to a local printer. Big name companies like FedEx and UPS offer large scale printing services. You may also have someone you know who has a large scale printer that you can use. Give them the flash drive, let them know the dimensions of your sign, and they will print it for you.


Comments
0 comment