
Making a Viking Shield out of Cardboard or Foam

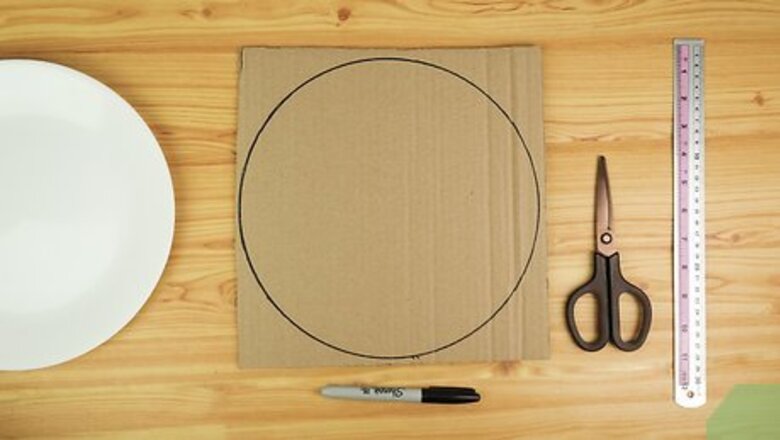
Trace a large circle on a piece of thick cardboard or foam. This circle will be your shield, so keep this in mind as you decide what size circle you want to trace. Viking shields were traditionally 3' in diameter, but you can make any size shield you like. Use a circular object, like a large bowl, to help make a perfect circle. You’ll want to choose a thick piece of cardboard or foam so that your shield holds its form. Cardboard from a recycled box will be plenty thick enough. If you're using foam, go for a piece that is at least a quarter-inch thick.

Use scissors to cut the cardboard or foam circle you just traced. Using scissors, carefully cut around the traced circle. This circle of cardboard will be your shield, so take your time making the cuts. Once you've cut the shield, you can always go back and fix jagged edges by rounding them out with the scissors. Be careful when cutting the cardboard or foam as the thickness of this material can make it challenging to cut. Just go slowly and make careful, intentional cuts as you follow the circle you've already traced.

Use a paintbrush and acrylic paint to paint your shield. You have complete creative freedom when it comes to decorating your shield. Stick with one color, or play around with a few different ones. You could try drawing ornate decorations or symbols. To go for a simple and traditional look, try dividing your shield into quarters and painting opposite quarters the same color. You can either leave the other two sections bare or paint the other opposing quarters a different color. If you are stumped on how you want to decorate your shield, go online and look at images of traditional Viking shields for inspiration. Place your shield on newspaper before painting it so that you don't make a mess.

Cut out a raised section of an egg carton and cover it with silver duct tape. While your paint is drying, find an empty egg carton and using scissors, carefully cut out one of the rounded sections that once held an egg. Cover this with several pieces of silver duct tape to give the illusion of metal. You'll want to make sure you cover the entire piece. This will go into the center of your shield and will look like a metal bolt.

Glue your duct tape covered egg carton piece to the center of the shield. Cover the bottom of the egg carton piece (which is now covered in duct tape) with glue, and attach it to the direct center of your shield. Use a strong glue like super glue, tacky glue, or even hot glue. Once you’ve glued this piece into the middle, you may want to hold it down for a few minutes to be sure it sticks.
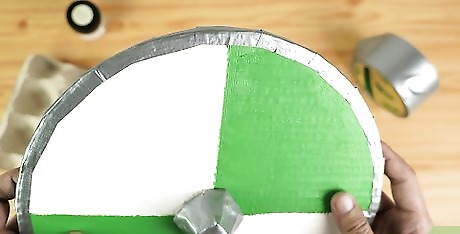
Wrap duct tape around the entire edge of your shield. Use small pieces of duct tape (pieces about 6" long) and tape around the edge of the shield with the silver tape. Working with smaller pieces of duct tape will help you to attach the tape around the curve of the shield. Cover the edges until it looks like your shield is wrapped in metal. You can also use brown or black tissue paper for this part. Cut a few strips of tissue paper and glue them around the edge of the shield. Viking's lined their shields with rawhide or leather, so this is a slightly more authentic look.

Attach a cardboard handle to the back of the shield with glue. Cut a rectangular strip of cardboard (roughly ten" long and three" wide) and place it in the center of the back of your shield. Attach each end with glue so that you can stick your hand through it.
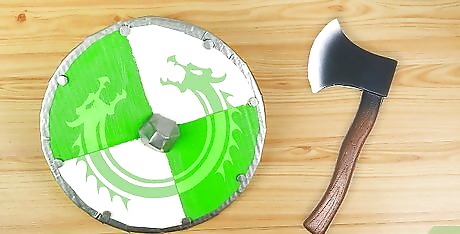
Add extra decorations or embellishments to your finished shield. Now that your shield is complete, you can continue to decorate it. Think about adding more paint, symbols, or materials to your finished shield.
Making a Viking Shield out of Plywood

Trace a large circle on a 3’ by 3’ sheet of 1/2" thick plywood. Begin constructing your wooden Viking shield by using a pencil to trace a large circle on a piece of plywood. Remember that this circle will be the shape of your shield, so choose the size accordingly. You can use a large bowl or circular object to help you draw a perfect circle. A traditional Viking shield was roughly 3’ in diameter, so this might be the size you want to create.
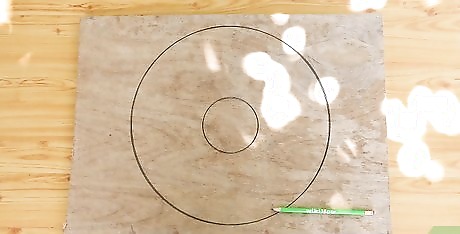
Trace another smaller circle in the center of the large circle. If you went with the traditional 3' diameter shield, you’ll want to trace a roughly 6" diameter circle in the center of your large traced circle. If you used a different size, trace a circle that is roughly 1/6th the size of your large circle.

Cut the large traced circle using a jigsaw. Using a jigsaw, carefully cut out your large traced circle. Go slowly to give yourself the best chance of cutting a perfect circle. Taking your time will also help keep you safe. You can always go back over any rough or jagged edges. Always take extra precautions when working with power tools, such as wearing goggles to protect your eyes and using work gloves to keep your hands safe from splinters.

Cut out the small traced circle using a jigsaw. Once you’ve cut your large circle, you will need to cut out the small circle in the middle. Go slowly, and cut carefully to make sure you stay safe and precise. You can always sand down rough sections later. In the end, you should have a large circular piece of plywood with a small circle cut out of the middle.

Sand all the edges you just cut. All the edges of the shield you just cut will be rough and splintered from the jigsaw. The small circle cut out of the middle will also be rough to the touch. Take the time to sand all of your cut edges to avoid getting splintered or hurt.

Sand a wooden block that is roughly 10’’ long, 1’’wide and ½’’ thick. This wooden block will be the handle of your sword. Sanding the handle will make it softer on your hand and eliminate the risk of splinters. You can also wrap this block in leather or fabric to make it more comfortable to grip. Attach the fabric with hot glue.

Set the wooden handle into the center of the interior circle. Place the handle into the middle of the small circular hole at the center of your shield, running vertically through the small circle. Remember that the handle will be on the back of the shield, so choose the side accordingly.
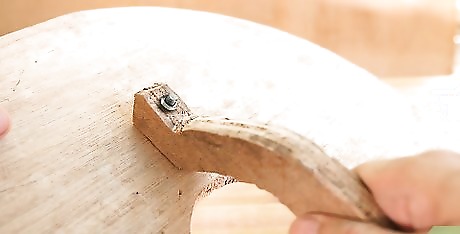
Attach the handle to the shield by drilling pilot holes followed by bolts. On each end of the handle, you are going to drill in one bolt. Start by drilling pilot holes where the bolts will go. Then, drill the bolts into the two pilot holes. You want the bolts to enter from the front of the shield. The nuts will be screwed onto the backside of the shield.

Attach a circular piece of metal to the center of the shield with bolts. On the front of your shield, lay a circular piece of sheet metal to cover the cut circle in the middle of your shield. Drill four pilot holes symmetrically around the metal circle (at 3, 6, 9 and 12 o'clock positions). Then, drill four bolts into the pilot holes, drilling the bolts from the front of the shield with the nuts screwed into the back of the shield. If at this point you are left with some long bolts sticking too far out of the back of your shield, you can carefully cut them with a hacksaw.
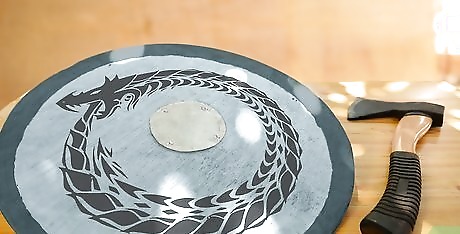
Paint, stain or decorate the shield to your liking. Now that you have created the frame of your shield, it is time to decorate it. You can use any shade of wood stain or wood-friendly paint to decorate your shield. You may want to draw symbols or designs on it. Spend some time looking at pictures of traditional Viking shields for inspiration. You can leave the edge of the shield bare, or use hot glue to attach leather or rawhide to cover the outer edge.


Comments
0 comment