
Making a 3-D Cross
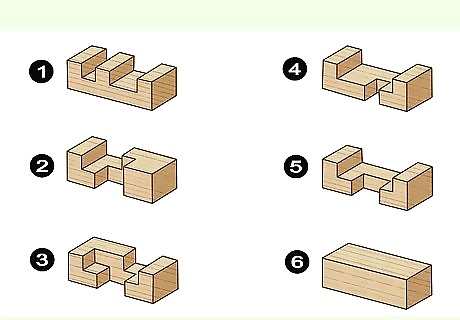
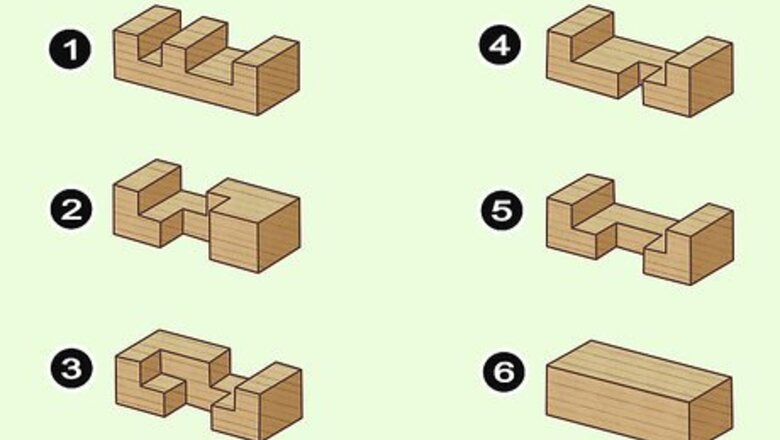
Identify the 6 pieces. There are 6 pieces to this puzzle. For clarity, the piece that has a partial notch in the middle with a square protruding underneath the notch will be #1. The piece with 1 short, rectangular notch and L-shaped sides will be #2. The piece that has 1 square notch and 1 small rectangular notch will be #3. The piece with 1 long rectangular notch will be #4. The piece with a partial notch in the middle that makes an L-shape will be #5. The long rectangular piece with no notches will be #6.

Fit piece #2 horizontally into piece #1. Find the piece with a partial notch in the middle and a square underneath the notch. Then find the piece with 1 short, rectangular notch with L-shaped sides. Fit them together so the piece with the square fits horizontally into the vertical piece with the L-shaped sides. The notch on the vertical piece should face toward you and the square shape on the other piece should face to the left and toward the vertical piece.

Slide piece #3 underneath piece #2 so they are perpendicular. This piece has 2 notches cut through it. Fit it underneath the horizontal piece perpendicularly. The notch should face toward the horizontal piece so they fit together.
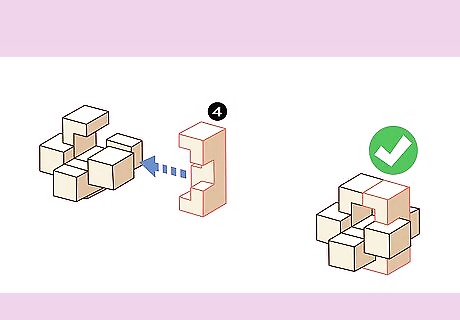
Match up piece #4 with piece #1. Hold piece #4 (with the long, rectangular notch) so it is a mirror image of the vertical piece, #1, with the notches facing each other. Slide piece #4 into the puzzle so it holds the horizontal pieces in place.

Slide piece #5 into the notches on the horizontal pieces. Hold piece #5 so the notch faces the vertical pieces and the flat part is on the outside. Position it horizontally on the left side of the vertical pieces and slide it into the notches on the existing horizontal pieces.
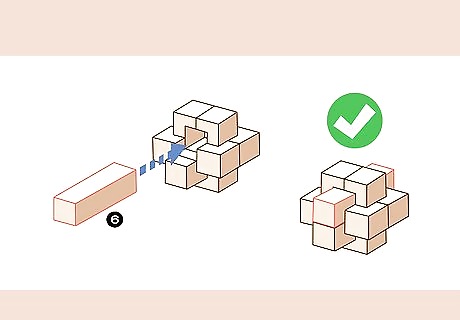
Slide the rectangular piece through the center opening. This is the last piece you need to add. Simply slip the long rectangular piece in the square opening in the center of the other pieces. Now the puzzle is locked together and complete!
Assembling a 6-Piece Star

Lay down 1 piece vertically on your workspace. All the pieces of this puzzle are identical, though some may be different colors. Choose any piece to begin with and lay it down vertically on your table or work surface. Each piece has triangular-shaped “peaks” that stick out as well as triangular-shaped “valleys” or indentations for the “peaks” on other pieces to fit into.

Stack another piece in the farthest valley of the first piece. Use a piece in a different color than the first. Turn the new piece sideways so the peaks point outward, and situate the middle peak of the new piece into the farthest valley, or indention, of the first piece. The pieces should be perpendicular to each other.

Slip the next piece into the closest valley of the first piece. Choose a piece that is the same color as the last 1. Turn it sideways and fit it into the closest valley of the first piece so the 2 are perpendicular to each other. The peaks should be pointing toward the last piece you added.
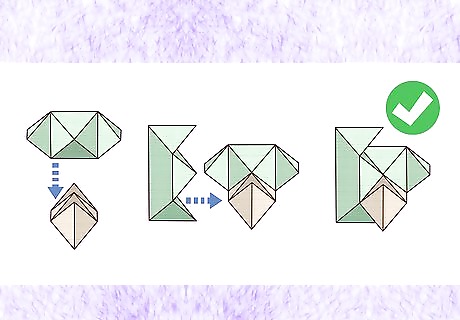
Stack a piece on top of the last 2 pieces. Select a piece that is the same color as the first piece. Flip the new piece over so the peaks and valleys face downward and it is parallel to the first piece. Nestle it on top of the 2 stacked pieces. At this point, you should have 4 identical pieces that are interlocked.
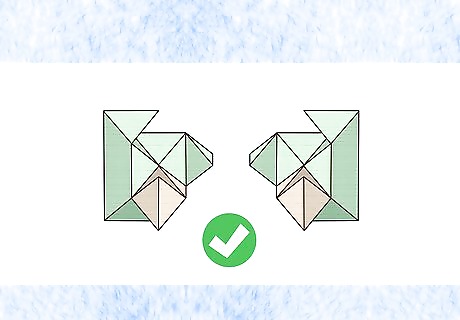
Turn the puzzle sideways and fit another piece in between the 2 vertical pieces. Turn the puzzle sideways so that there are 2 pieces pointing vertically. Hold the puzzle in 1 hand and use the other hand to slide a piece horizontally in between the 2 vertical pieces.
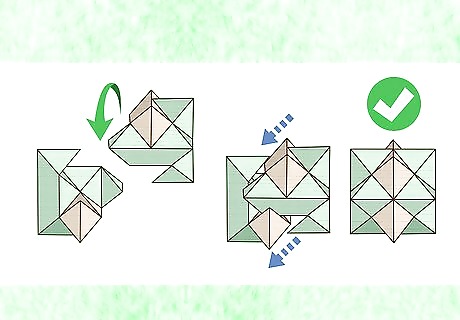
Flip the puzzle over and fit the last piece in between the 2 vertical pieces. Turn the puzzle over so the last piece you added is on the bottom. Slide the last piece in between the 2 pieces that are sticking up vertically so that it is parallel with the last piece you added. You may have to wiggle or manipulate it a bit to get it to fit. You’ve now solved a 6-piece wooden star puzzle!
Solving a Snake Cube
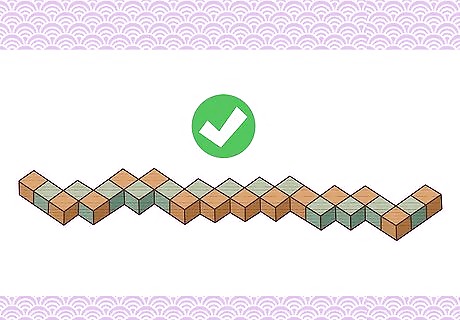
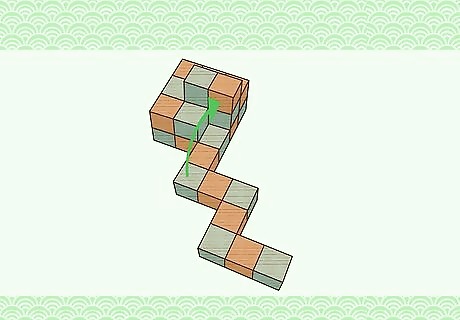
Unwind the pieces to make 1 line. If the puzzle is already in cube form or if you’ve been working on solving it, you’ll need to start over. Unwind the pieces so it makes 1 line that looks like a series of stairs. Arrange the line so the pieces at the end of the left-hand side point up and the pieces at the end of the right-hand side point down.

Fold the third diagonal column from the right 180° beneath itself. The column on the farthest right will be pointing downward. Look for the third diagonal column to the left of the right-hand edge, which should be pointing up and to the left and have 3 cubes. Fold the 3 cubes of that row 180° toward you underneath the puzzle so they are now parallel with and even to the row next to them.

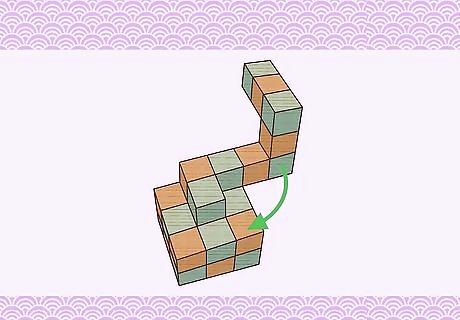
Rotate the pieces on the right side back 90° then up 90°. Take the 2-cube column next to the 2 parallel columns and rotate it back 90°. Then rotate the column on the end 90° upward so the 3 cubes are vertical.

Flip the same pieces inward 90° then fold the last column down 90°. Keeping your hand on the last pieces you moved, rotate both columns inward toward you 90°. Then, push the 3-cube column down and away from you 90° so it is parallel with the floor.

Rotate the left-hand columns inward 90° then clockwise 180°. Find the bottom cube of the second 3-cube column from the left. Fold it in toward you 90°. Then, find the lowest cube on the column to the left of the column you just manipulated and rotate it 180° clockwise.

Rotate the right-hand columns 90° to the right then 180° away from you. Find the top cube in the 2-cube column you just rotated. Rotate it 90° to the right so the 3-column row is stacked on the row beneath it. The long piece on the right will look like stairs. Fold the last cube on the right-hand side in the 3-cube column you just rotated upwards 180° away from you so it lies flat on the row beneath it.
Fold the last cube in the 3-cube column to the left 90°. Then, let go of the puzzle with your left hand, using your right hand to hold the pieces in the “stair” line that haven’t yet been folded. This will rotate the puzzle so the extra cubes are on top.
Rotate the end columns down 90° then back 180°. Grasp the 2 columns of cubes that are sticking up in the line next to the partially completed cube and fold them down 90° toward you. Then rotate the column on the right side of the cube back away from you 180°.

Fold the last 3 columns into a “u” shape to complete the puzzle. Flip the column to the right of the cube back toward you 180°. Then fold the column that is the second to the end on the right-hand side down 90°. To finish the puzzle, rotate the last remaining column 180°.


Comments
0 comment