
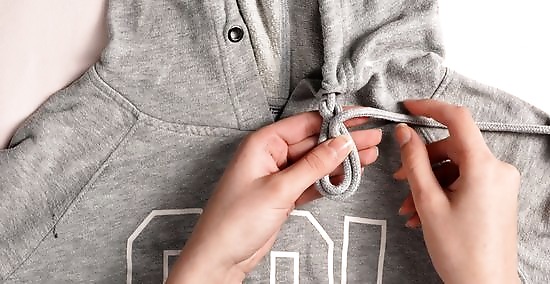
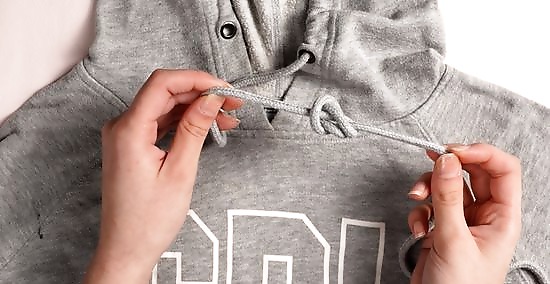
- To make a barrel knot, wrap one string around 2 fingers to make an X. Wrap the string around the left side of the X two to three times to create loops.
- Thread the end of the string along the crack between your two fingers, behind the X and the loops in front of your fingers.
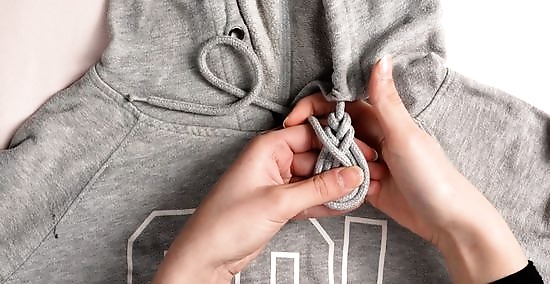
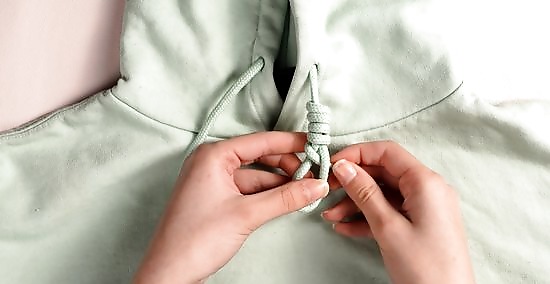
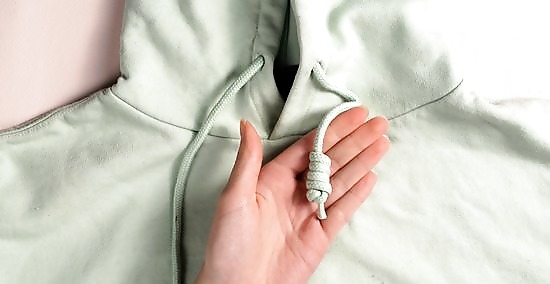
- Slide the loops off your finger. Gently pull on both ends of the string, making sure the loops don’t cross over each other to tighten the barrel knot.
Tying Hoodie Strings with a Barrel Knot
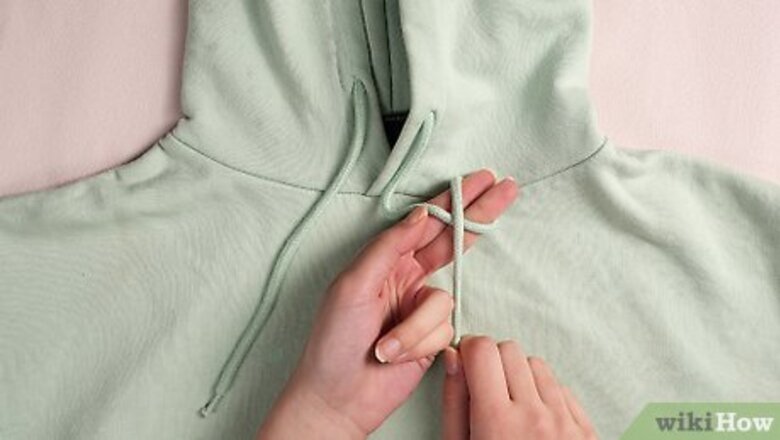
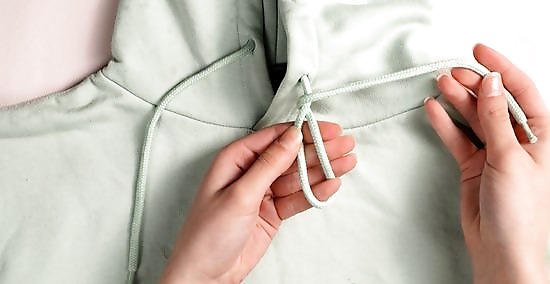
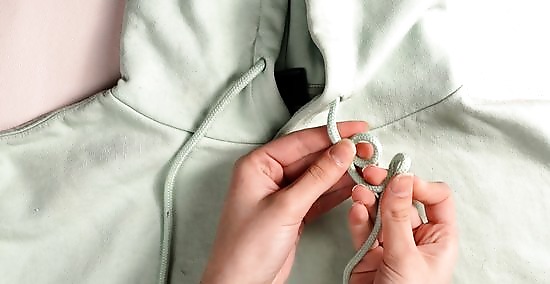
Wrap one string around two fingers in an X formation. Hold two fingers out perpendicularly on top of one of the strings. Pull the string up and to the right over your fingers. Pull the string behind your fingers, then pull it over your fingers and to the left of the other string to create an X. The X should be about ¾ of the way up the hoodie string to give you enough string at the end to complete the knot. Gently pull at the top of the string if you need more slack.

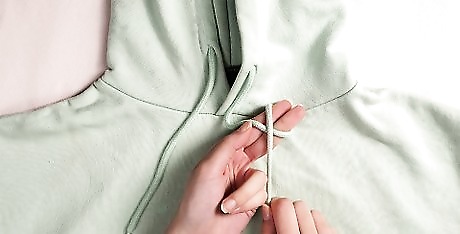
Wrap the string around the left side of the X two to three times. Take the end of the string and pull it down and over the top of your fingers. Repeat this motion two or three times. Tuck the loops along the line of the X that sticks out to the left on the top of your fingers. As you’re wrapping, make sure you don’t cross over and to the left of the top of the string—create all the loops on the right side of the top of the hoodie string.
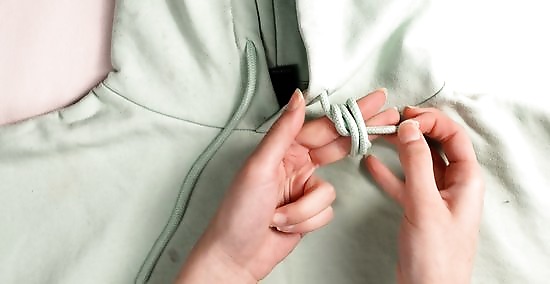
Thread the end of the string behind the strings in front of your fingers. Thread the end of the string on the left side of the knot, behind the X and the loops, along the crack between your two fingers. Grab the end of the string on the other side and pull it through. Open your fingers slightly to thread the string through if you need more room.
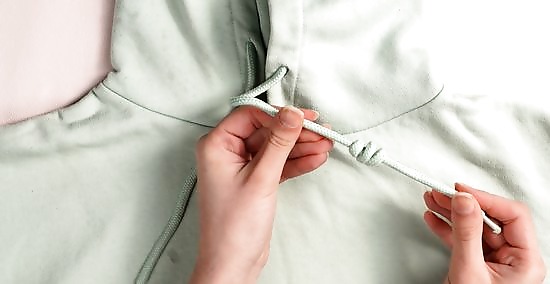
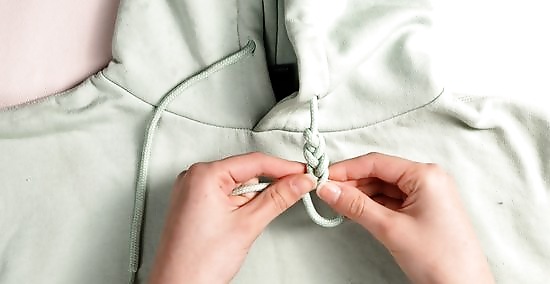
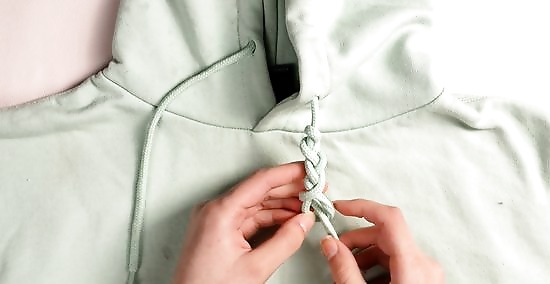
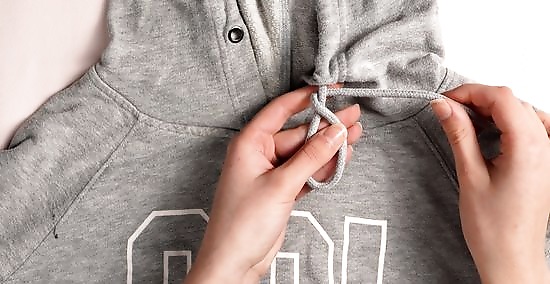
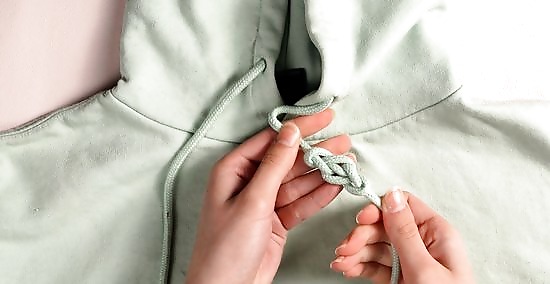
Pull the loops off your fingers and pull both ends to tighten the knot. Make sure the three loops you created don’t cross over each other as you gently pull on the top and bottom of the string. As you tighten, keep pushing the three loops together to create an even barrel knot.
Tying Hoodie Strings with a Single Strand Braid
Create a loop with the end of the string on top and to the left. Bring the end under the string, about halfway up the entire hoodie string. This creates a loop with the end of the string on the left side. The loop will be about the same size as the braid.

Thread the string end behind the loop and to the right. Adjust the loop so the end of the string wraps around the very top of the loop, with the end of the string out to the right.

Twist the large loop to the left and thread the end behind the loop. Push the top of the end of the string snugly against the other threads at the top of the knot. This creates the braid at the top.
Twist the new loop to the right and thread the end behind the loop. As you twist the loop and thread the end through, the rest of the loop at the bottom of the braid will get smaller and smaller.
Repeat the previous two steps until there’s no more loop to twist. When you reach the end, you’ll see a small hole at the bottom that’s too small to twist but large enough so you can thread the end of the string through it.

Thread the end through the hole and tighten the braid. If you still have a small gap at the bottom of the braid, gently tug on the loops in the braid to make sure the knot is even all along the hoodie string. Tug on the top and bottom strings to tighten the braid. Repeat all of these steps on the opposite hoodie string to create the same knot on both sides.
Tying Hoodie Strings with a Pipa Knot

Create a loop with the end of the string over and to the left. Create this knot near the top of the hoodie string so you have enough slack. This loop will be about the same size as your finished knot.
Wrap the end of the string around the back of the top string. This will create a small wrap at the top of the loop. Hold the loop still as you pull the end of the string over the loop and to the left.
Form another loop to fit inside of the first loop. Bring the end of the string down in front of the loop. Starting on the left of the first loop, create a new loop to curl along the string that makes the first loop.

Bring the end behind the back of the hoodie string. With the same motion you did in the second step, bring the end of the string behind the top of the hoodie string. Tuck this new small wrap under the one you made in the second step. Cross the end over to the left.

Form a third loop to just fit inside of the second loop. Bring the end of the string in front of the two previous loops. Starting on the left, feed the string inside the second loop. This will create a small hole in the middle of the third loop.
Bring the string end around the back and to the right of the knot. Tuck the string end underneath the first and second wraps at the top of the loops. Cross the end over and to the left of the knot. If the hole in the center of your knot is too large, make another small loop inside the previous loop and repeat this step.

Stick the tail end into the center of the last loop and tighten the knot. Feed the string through the hole in the center of the last loop and pull it through. Make sure the string tucks against the other knots you made in the previous steps. Gently tug on the end of the string to tighten the knot. As you tighten the knot, make sure the loops are completely flat. Repeat the same steps on the opposite hoodie string to create the same knot on both sides.
Tying Hoodie Strings with a Single Strand Diamond Knot

Make two loops overlapping each other along one string. Take the end of the string and bring it over and to the left to create a small loop. Fold the same string up and over again to create another loop of the same size. Make sure the second loop overlaps the first loop slightly. The end of the string should lead over to the left. When done correctly, these loops form a kind of pretzel shape.

Thread the end over the first sides of the loops and under the second sides. Take the end of the string. Pull it over the first side of the top loop and under the second side of the bottom loop. Pull the end over the first side of the top loop and under the second side of the bottom loop. Try not to pull the string all the way through—this will create a loop you’ll use in the next step.
Bring the end around the knot and through the top of the new loop. Take the end of the string and bring it around to the front of the new loop you created in the previous step. Thread the end in the space between the loop and the two strings inside the loop.
Push the end under and around the two strings in the loop. Take the end of the string and pull it underneath the two strings sitting inside the new loop. Pull the end through the hole just on the other side of the two strings.
Tighten the knot by pulling on both ends of the string slowly. As you pull, rearrange the knot as you go to make sure each loop is even. Once you tighten the knot halfway, pull on the strings to tighten each loop individually and work out all the slack. The completed knot looks like a small tight ball.
Tying Hoodie Strings with a Coil Knot

Fold one string upwards with the end over the string and to the right. This will create a small loop. Make sure the end of the string is more than three times the length of the loop so you have enough string to wrap.

Wrap the end of the string around the loop 6 times. Bring the tail end behind the top of the string and wrap it around the loop. Wrap the string around the loop 6 times or until the loop is almost completely covered. You should end up with a small hole that’s barely large enough to thread the tail end of the string through.
Thread the end of the string through the top of the loop. As you wrap the string around the loop, the loop will get smaller until there’s only a small hole left—push the tail end of the string into that hole and pull it all the way through.
Tug gently on the upper string to secure the knot tightly. As you tug, push the string layers on the knot close together. Try not to pull too tightly on the bottom of the string—this could make the knot look uneven. Repeat the same steps on the opposite hoodie string to create the same knot on both sides.
Tying Hoodie Strings with an Elongated Eternity Knot
Create a small loop with the end of the string under and to the left. Make sure the loop is about halfway up the hoodie string so you have enough slack to make the knot.
Poke a small section of string through the loop to form a second loop. Make sure the second loop is about the same size as the first loop. Pull gently on the top of the hoodie string to slightly tighten the first loop around the second.

Thread the end of the string through the back of the second loop. Pull gently until you form a third loop on the side of the other two loops. Make sure this third loop is slightly larger than the two previous loops.

Twist the third loop to the right and thread the end through the top. Pull the string end until it’s all the way through.
Tighten the knot by gently tugging on both sides of the hoodie string. As you tighten the knot, tug gently on the loops so they’re even. Repeat the same steps on the opposite hoodie string to create the same knot on both sides.
Tying Hoodie Strings with a Carrick Bend

Create a loop using the left hoodie string. Near the top of the left hoodie string, create a loop so the second half of the string lies over the top. Make sure the tail end of the string leads over to the left. Unlike the previous knots, this knot ties uses both hoodie strings and ties them together in the center of the hoodie.
Lay the right hoodie string behind the loop. Bring the right hoodie string to the left side of the knot. The right hoodie string should form an X with the left string just below where the loop forms.
Thread the right string under the top of the left string. Pull the end of the right string through. Now the right string is back on the right side and the left string is on the left. At this point, the knot looks a little like an upside-down pretzel. The middle of the knot has three holes, separated by two strings.

Pull the right string through the middle hole and under the right string. Thread the end of the right string through the top of the middle hole in the knot. Pull the end under the string just to the right inside the knot. Pull the thread up through the hole on the right.

Tighten the knot by pulling on the top and bottom of both strings. Gently pull on the top and bottom of each of the strings until your knot is flat and even. Tug on the loops on the sides of the knot to loosen it if you pull too hard on the strings.


Comments
0 comment