
X
Research source
are usually circular in design and have religious significance. They take a lot of time to make in real life, and are even harder to perfect. Angles and points also have an important role in the making of one.
Now, using Inkscape, you can create simple mandalas by just inputting a little information.
Note: If an image in the following steps appears too small, simply click on the image for a much bigger size!
Download Inkscape here, if you haven't already installed it. Don't worry, this program is completely safe and does not harm your computer in the least.
Open Inkscape. It will most probably be in your operating system's program manager (the Applications folder in Mac OS X, the Start Menu in Windows, or the Applications menu in most Unix desktop environments).
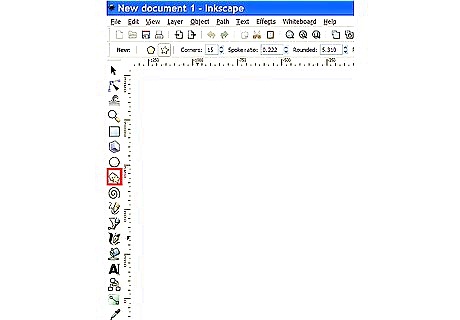
Select the polygon tool, which is represented as a polygon and star in the toolbar. The following toolbar will be visible at the top:Make a Mandala in Inkscape Step 3Bullet1.jpg
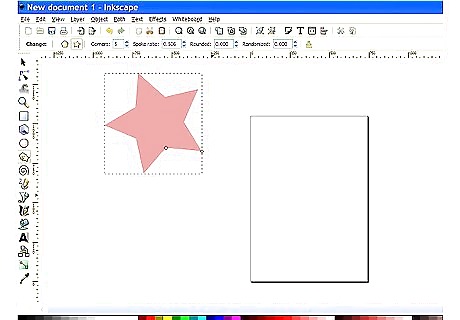
Click and Drag to create your shape/star. The more you drag your mouse outward, the larger the star will be, and the other way around. Don't take too much time perfecting the size, but make sure it is easy to manipulate. As you form the desired polygon, two small white squares appear on an inner point and an outer point. This is to make the shape of the star.Make a Mandala in Inkscape Step 4Bullet1.jpg Pulling the outer square out will result in a thinner, longer pointed star, while pulling inward will make a smaller, stouter star. Pulling the inner square out will make the star bigger and wider, possibly turning it into a pentagon. Pushing it in will make the star thinner overall, so be careful when using it. Decide your final shape. Again, as long as the size is easy to use, go with it; you don't need to be exact.Make a Mandala in Inkscape Step 4Bullet4.jpg

Take a look at the toolbar again. See all of the type-in boxes? This will adjust the different qualities of the stars. Explanations of the different things in this: The two shapesMake a Mandala in Inkscape Step 5Bullet1.jpg There is a 5 pointed star, and a pentagon. Simply put, the pentagon is for making a polygon, and the star for, well, a star!Make a Mandala in Inkscape Step 5Bullet2.jpg CornersMake a Mandala in Inkscape Step 5Bullet3.jpg For Polygon: This is for the amount of points/corners in the shape. You can make a triangle with 3, square with 4, pentagon with 5, etc...Make a Mandala in Inkscape Step 5Bullet5.jpg For Star: This is the amount of extending points in the star. 3 for three pointed, 4 for 4 pointed, 5 for 5 pointed, etc... Also, there is an unlimited amount of corners you can do, though it starts getting too circular as it increases too much. Note: There is no 2 because it is impossible to make a plane figure with less than 3 sides. Spoke RatioMake a Mandala in Inkscape Step 5Bullet9.jpg This basically shows how wide/thin the sides and middle will be. the higher the ratio, the wider the star/polygon will be. It gets thinner as it lowers.Make a Mandala in Inkscape Step 5Bullet10.jpg The maximum ratio is 1 ( a star turns into a polygon), and the minimum is .010 (Quite thin) RoundedMake a Mandala in Inkscape Step 5Bullet12.jpg This is used to make rounded segments in the star/polygon (or just rounds the point); the larger number, the larger the shape will be, it also goes into negatives, where it goes the opposite direction. This goes into many various forms and changes as the other parts of the shape change(corner, spoke ratio, etc...). This is the most important component in making a mandala.Make a Mandala in Inkscape Step 5Bullet13.jpg Note: The more corners you add to the mandala, the more sophisticated everything will look. RandomizedMake a Mandala in Inkscape Step 5Bullet15.jpg This makes the shape asymmetrical. It is not recommended you use this part when making a mandala, as it is important to make it as geometrical as possible. You can save the randomization tool for making abstract art.Make a Mandala in Inkscape Step 5Bullet16.jpg Experiment with these! Testing out the buttons may not be a good thing to do in this case of picking between a green and a red button, but it is perfect to do it in this case! Once you get the hang of it, manipulating the shape will be much easier. Try making a file specifically used for making test designs, that way, you can save much more room, and record data for next time if needed.
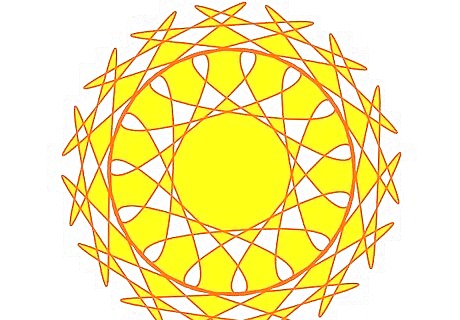
Start the real mandala. After you are done working out what you want to do, make the real shape. Input the information(or just use the arrows!), and start adding some finishing touches. You can add gradients, blurs, swirls, or anything else you may think of! The following is an example of what you would be doing. Examine how much the shape can change with such simple actions:
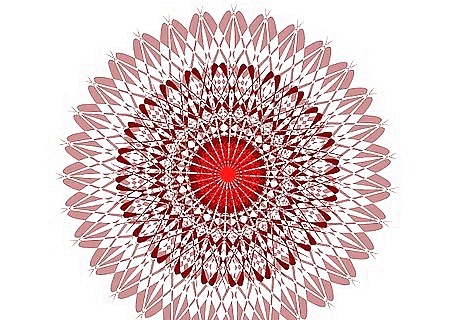
Try putting in multiple designs. You can try overlapping two, three, four, or even more designs over one. This can make a really wonderful effect (a burst of colors, really), and make it even more attractive. However, make sure you use the opacity properly, some things need to be more bold than others, so you can make other objects more transparent. To do so, select the object by clicking on it once, then click the black paintbrush at the top within a box. You will come up with another window. There will be two sliding bars. They are labeled the following: Blur This makes the selected shape lighter and "fuzzier." Make sure you don't overuse it, it will only look like a cloud by then. this feature is highly recommended for making backgrounds and the like. Opacity This makes the shape more transparent or solid, however, if you make it too transparent, you might be unable to see it.Make a Mandala in Inkscape Step 7Bullet2.jpg


Comments
0 comment