

Determining U.S. Thread Pitch

Measure an inch-long portion of the threaded area. Grab a ruler and lay it along the bolt or screw. Be sure to measure the threaded (or ridged) area only, starting from near the head. If your threaded area is less than an inch, measure out 1/2 an inch instead. U.S. thread pitch is measured in threads per inch, so that's why you need to start by measuring out an inch of the threaded area.
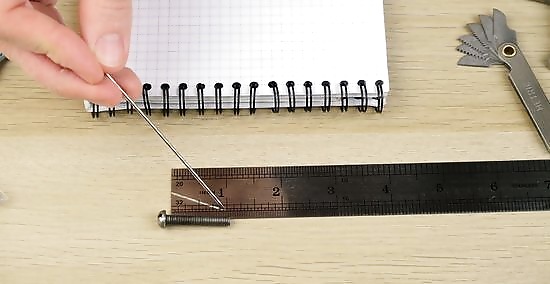
Count the number of threads in 1 inch. When looking at the thread from the side, you'll see areas that are raised ("mountains") and areas that are lower ("valleys"). Only count the raised areas or the "mountains," not the valleys. Start from one end and number each thread. When you get to 1 inch, write down your total. For instance, you might have 8 threads per inch (TPI). If the threaded area is less than an inch, multiply to get an inch. For instance, if you can only measure out 1/2 an inch, multiply the number you count by 2 to get the amount that would be in a full inch. In this case, if you counted 10 threads in a half inch, you would multiply by 2 to get 20 threads per inch.
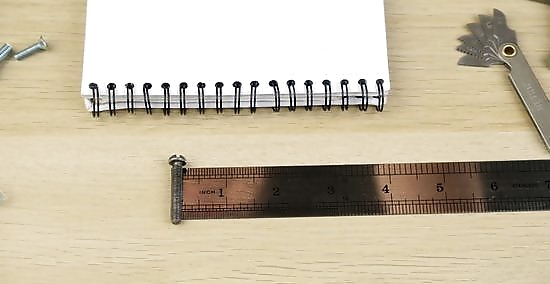
Measure the diameter and the length of the threaded area. The diameter is the width across the screw or bolt. It's easiest to measure this with a caliper, but you can also measure it with a ruler. Measure what's known as the major diameter, which is from the top of a "mountain" on one side to the top of the opposite "mountain" directly across the screw. The length is how far it is from the bottom of the head to the tip of the screw or bolt. For instance, the diameter might be 1/4 of an inch and the length might be 1 inch. When using a caliper, put the arms flush against the middle part of the threads to measure the diameter. The number will pop up on the screen if it's digital; if it's not, you'll need to read the measurement on the instrument.

Plug the information into a standard measurement. Start with the diameter. Then add the TPI, followed by the length of the threaded area. The measurement will look like this: 1/4 inch x 20 x 1 inch, which is the diameter, the TPI, and the length in order.
Figuring out Metric Thread Pitch
Measure the distance from one thread to the next. Hold a ruler up against the threads, lengthwise. Measure from one high point (one mountain) to the next in millimeters. You'll need a very detailed ruler for this, as the distance between threads could be as small as 0.4 millimeters. This can be difficult for very fine screws, so you may want to use a pitch gauge for those if possible.

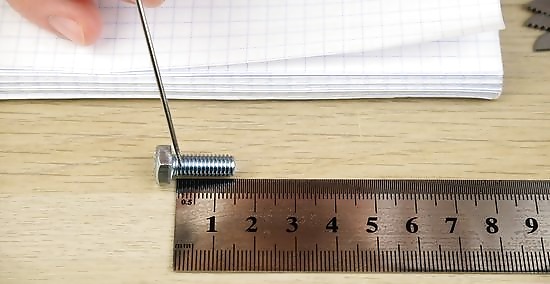
Determine the diameter and the length of the threaded area. Measure from the bottom of the head to the end of the threaded area in millimeters. For instance, it might be 8 millimeters. Then, measure the diameter (width) of the threaded area in millimeters. This might be 4 millimeters across. Always measure the major diameter, which is the distance across the threaded area from one high point of the thread to the other, instead of measuring low points that are across from each other.
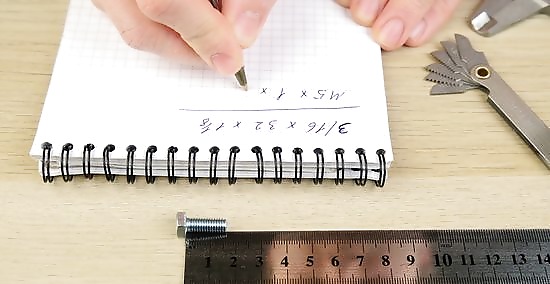
Plug the measurements in to the standard metric form. Start out with the diameter with an M in front of it. Then, add the pitch next. Follow that with the length of the threaded area in millimeters with an M behind it. Therefore, in this case, your measurement would be M4 X 0.4 X 8M.
Using a Caliper and a Pitch Gauge

Determine if the threads are tapered. To use a caliper, place the points of the caliper on either side of the item you want to measure. Line up the caliper on the outside of the threads at the bottom end, away from the head. It will tell you the width. Slide the point so it's up against the threads.The measurement should pop up on a screen if it is digital. Otherwise, you'll need to read the number on the sliding part. Do the same on the threaded area near the head. If the number is larger near the head, then it's a tapered thread. If it's the same, then it's not tapered.

Use a caliper to measure the diameter. If the threads are tapered, measure at the 4th or 5th thread down from the head, essentially in the middle of the threaded area. If it's not tapered, measure anywhere along the threads. When using a caliper, you may notice there are a few places where the arms don't meet flush against each other, sometimes along the ruler edge. Do not put what you want to measure in those gaps. You should have the arms flush against the threads.

Press the pitch gauge into the threads to find the pitch. The pitch gauge has little arms that you pull out. Each one has teeth in it that match certain pitches. Try to fit the teeth into your threads until you find the one that matches. The number for that pitch will be on the arm. It will be in TPI or in metric, depending on the type of pitch gauge you have.

Put the numbers into a standard measurement. Once you have the pitch, then you can measure the length of the bolt or screw from under the head and put all of your numbers into a standard measurement. A standard measurement will be the diameter, then the thread pitch or TPI, followed by the length. If your measurement for a metric screw is a diameter of 4 millimeters, a thread pitch of 0.4 millimeters, and a length of 8 millimeters, your measurement would be M4 X 0.4 X 8M. For a U.S. screw, it might be 1/4 inch in diameter, 20 TPI, and 1 inch long, which you'd write like this: 1/4 inch x 20 x 1 inch.


Comments
0 comment