
Application

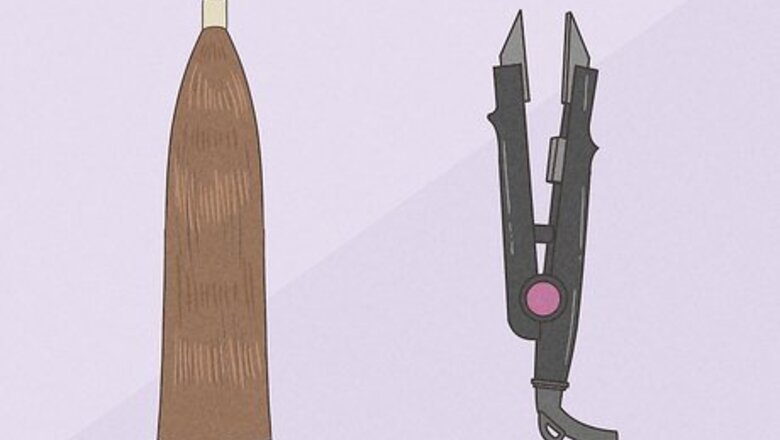
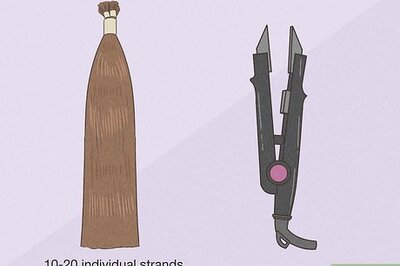
Buy pre-bonded keratin extensions and a melting connector tool. Purchase pre-bonded extensions with the glue already on the tips. The color, length, and weight of the extensions is up to you! Don't forget to buy the melting connector tool (some brands call it a hot fusion wand). This tool heats the keratin glue on the tip of each extension so it bonds to your real hair. Keratin extensions are usually sold in packs of 10-20 individual strands. If you want to apply a full head of extensions, you'll need 100-180 strands. Get extensions that match your hair's texture so they’ll blend in naturally. Buy pre-bonded keratin extensions and the melting tool online or at a salon.
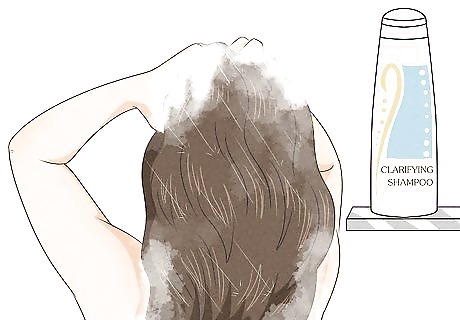
Wash your hair with clarifying shampoo and dry it completely. Clarifying shampoo strips oils and product buildup out of your hair so the keratin glue can bond strongly to your real hair. Extensions may fall out early if you don’t get a good bond during the application process, so don't skip this part! Let your hair air-dry completely or blow dry it before applying extensions.
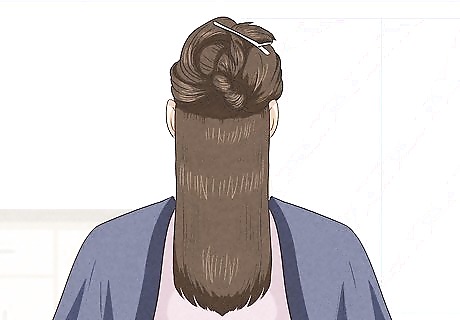
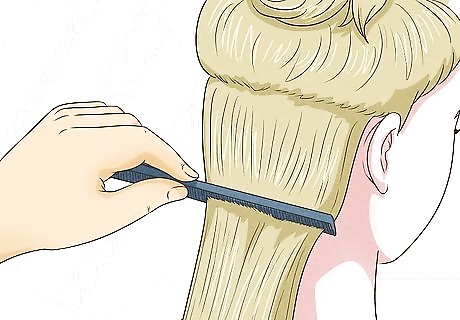
Clip up all of your hair except for a thin, horizontal row at your nape. Pile all of your hair on top of your head and use a rattail comb or your fingers to section out the bottom 1 in (2.5 cm) of your hair. Make sure this thin, horizontal row of hair stretches from one end of your nape to the other. Go ahead and plug in the melting connector tool so it can heat up for a few minutes.

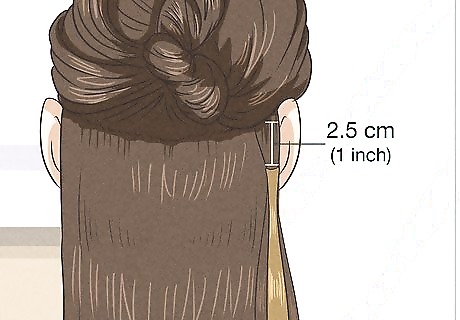
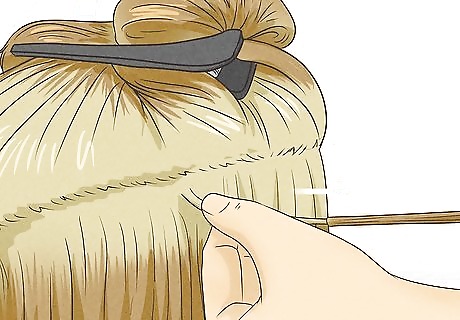
Grab a small clump of hair about the same width as the extension. Start on one side of your head so you can work systematically to the other side. Pick up a small chunk of hair about 1 in (2.5 cm) from the edge of your hair. The chunk's thickness should be about equal to the extension. Be sure to leave a thin layer of hair beneath the bottom row so the extensions won't be visible when your hair is in a ponytail. Each chunk of hair needs to be the same thickness as the extension so your hair can support the extension's weight. If the extension is too heavy, it might pull out or damage your natural hair. Start 1 in (2.5 cm) from the edge so the extensions won’t be visible when you have your hair up.
Place the extension next to your real hair 1 in (2.5 cm) from your scalp. Hold the extension so the tip with the pre-bonded glue is facing your scalp. Put the extension right next to the chunk of hair, leaving about 1 in (2.5 cm) of room between the extension and your scalp. If you bond extensions closer to your scalp than 1 in (2.5 cm), they'll be tight and uncomfortable.
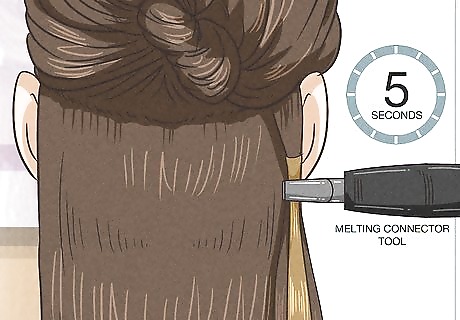
Clamp the extension and your hair with the heat tool for 5 seconds. Place the extension and the chunk of your natural hair in between the tool’s heated plates. Squeeze the tool to clamp it down. Make sure the tool is directly on top of the keratin bond so the glue melts evenly. After a few seconds, unclamp the tool and pull it away. The melting connector tool melts the glue and fuses the extension to your natural hair. Don’t clamp for longer than 5 seconds. Too much heat can damage your natural hair and the extension.
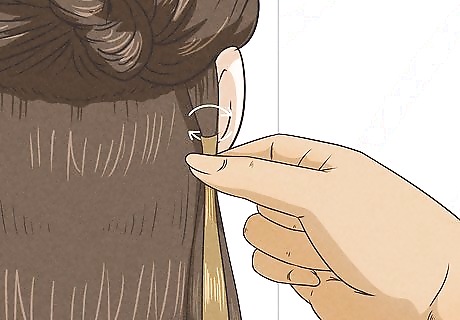
Pinch and roll the hair at the bonded spot for a few seconds. Pinch the melted glue with your thumb and forefinger and squeeze the hair and extension together. Then, roll them together with your fingers for a few seconds to finish fusing the extension to your hair. Since the glue melts easily without a ton of heat, you should be able to pinch the hair right after you move the tool away. If the glue is too hot to touch, give it a few seconds to cool and try applying less heat for the next extension.
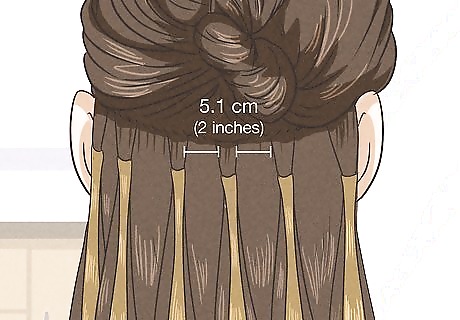
Keep applying extensions 2 in (5.1 cm) apart until you get to the end of the row. The spacing between extensions depends on your goal—the closer you put the extensions to one another, the thicker your hair will look. If you aren’t sure, 2 in (5.1 cm) spacing is pretty standard. Continue grabbing chunks of hair and fusing extensions to them until you reach the end of the horizontal row of hair.
Continue pulling down horizontal rows of hair and applying extensions. Once you finish adding the first row of extensions, move up your scalp about 1 in (2.5 cm) and use the end of a rattail comb to pull out the next thin, horizontal row of hair. Work from one end of the row to the other, continuing to space the extensions 2 in (5.1 cm) apart. Once you finish the second row, move up 2 in (5.1 cm) and pull down another thin, horizontal row of hair. Continue applying extensions using the same process. This is probably starting to get a bit tedious, but your new look will be totally worth it! Each time you pull down a horizontal row, be sure to leave the rest of your hair clipped up and out of the way. Working with 1 in (2.5 cm) horizontal rows is standard for a full head application, but you can put more space between rows if you want. The more space you put between horizontal rows, the less voluminous your results will be.

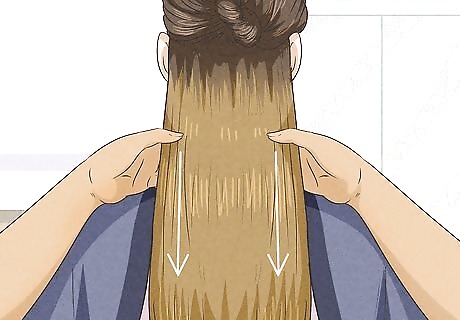
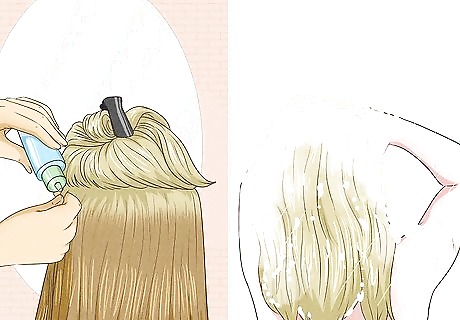
Apply the final row at temple level and unclip the top of your hair. You can stop creating rows before you reach temple level, but don't create rows any higher than that. The top layer of hair that's still clipped up will cover the last row of extensions. Once you apply the final row, remove the clip and shake out your hair. Run your fingers through your hair gently while the hair is still warm to blend in the extensions so they look natural. Give the keratin glue about 30 minutes to cool before brushing your hair. Wait 48 hours before washing your hair so the bonds can seal completely.
Maintenance and Care

Wash your hair 3-4 times weekly with quality sulfate-free products. Buy sulfate-free shampoo and conditioner with plenty of proteins and moisturizing ingredients to keep your hair healthy and strong. Wash the extensions by gently working in the shampoo from the top down and rinse well. Apply conditioner from the mid shaft to the ends and rinse it out thoroughly. Sulfates can break down the keratin glue and cause extensions to fall out. Products usually say “sulfate-free” on the label. To confirm, check the ingredients for sodium lauryl sulfate or sodium laureth sulfate.

Dry your hair thoroughly to prevent mold growth and scalp issues. Always blow dry your hair using a low heat setting after washing it. If you want to limit your use of heat styling tools, let your hair air-dry partially first and finish up with the blow dryer. Make sure you dry the roots of your hair, too. Leaving the bonded hair damp can create fungal and scalp issues. If this happens to you, don't worry! Just take out your extensions as soon as possible.
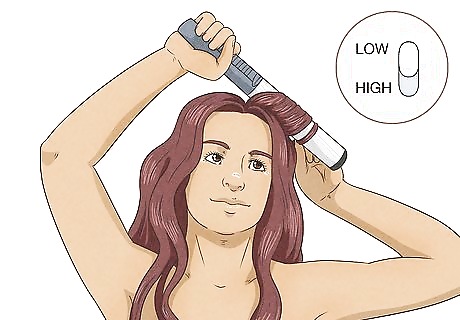
Use heat styling tools on LOW and don't apply heat directly to the bonds. Blow drying, curling, and straightening are all fine to do with keratin extensions, but stick to the low heat setting so your hair doesn't get too hot. Also, avoid concentrating heat on the bonded areas of hair. Too much heat can melt the bonds and make your extensions fall out.

Style your hair normally using lightweight styling products. Keratin extensions can be styled just like your real hair, so feel free to play around with different looks! Gel, mousse, and other styling products are safe to use, but stick with lightweight, oil-free formulas. Heavy product buildup and oils can weaken the keratin bonds. Your extensions won't be visible when your hair is in a ponytail, top knot, or other up-dos. You may want to avoid half ponytails since the extensions might be visible.
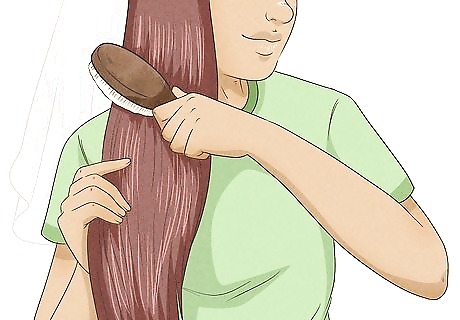
Brush your hair daily with an extensions brush to prevent matting. Tangle-free hair helps your extensions last as long as possible and keeps your hair healthy. Brush through your hair thoroughly and gently with an extensions brush at least once per day to get rid of any knots or tangles. Remember to brush the roots gently so you don’t damage the bonds. An extension brush is a special brush that allows you to brush your hair without damaging the bonds or pulling at your roots. Buy an extension brush online or at your local beauty supply store. There are many sizes, shapes, and styles to choose from!
Removal
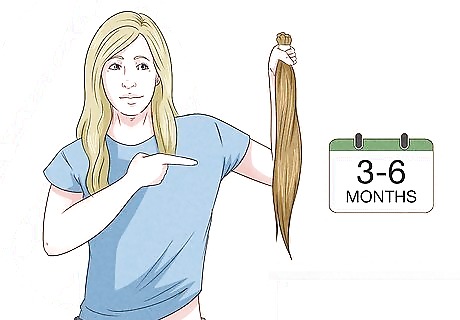
Take out your extensions 3-6 months after installation. Keratin extensions can last up to 6 months as long as you maintain them properly! Definitely don’t go beyond the 6-month mark, though—this puts too much stress and weight on your natural hair. Long periods of stress and weight can cause hair damage or hair loss. If you want to reapply extensions, give your hair a break for 1-2 weeks before applying the new set.

Section your hair and clip it up to reveal the bottom row of extensions. To remove your extensions, section your hair the same way you did when you applied them—pile all of your hair on top of your head and clip it out of the way. Use a rattail comb to pull down the bottom layer of hair and expose the first row of extensions.
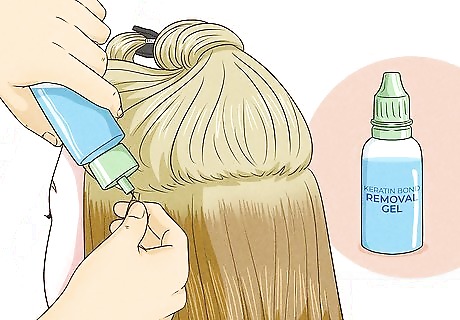
Coat each bond with keratin bond removal gel. Removal gel contains special ingredients that help to dissolve the bond and make the removal process pain-free. Squirt a generous amount on the first bond and pinch the area a few times with your fingers so the gel fully saturates the bond. Purchase keratin bond removal gel online or at a beauty supply shop.

Clamp the bonded area 8-10 times with the keratin removal tool. Squeeze the removal tool’s handle with your hand to clamp down over the bond. Apply pressure to the bonded area and then relax your hand. Work your way up and down the bond, clamping 8-10 times, to loosen it up enough for removal. The keratin removal tool looks like a small pair of pliers. It weakens the bond so you can pull the extension away painlessly and without damaging your hair. Buy the removal tool online or at a beauty supply store.
Hold your natural hair by the root and pull the extension away. Pinch the hair above the bonded area so it doesn’t hurt when you pull off the extension. Then, grab the extension and slowly pull it away from your real hair. Throw away the used extension immediately. Unfortunately, you can’t reuse keratin extensions like you can other types of extensions.
Run a fine-tooth comb through your hair to remove glue residue. After you remove the extension, it's normal to see a small amount of keratin glue residue on your hair where the extension was bonded. Run a fine-tooth comb through your hair a few times to remove the glue residue. The residue should be soft and easy to comb out since your hair is saturated with the remover gel.
Clip the hair out of the way and remove the remaining extensions. After you pull away the extension, clip that clump of natural hair up with the rest of the hair on top of your head. Use the same process to finish removing extensions in the first row. Then, pull down the next section of hair with a rattail comb and continue removing the extensions. Work systematically so you don't accidentally miss any extensions! After you remove the extensions, wash your hair to get rid of any leftover glue.


Comments
0 comment