
Building the Footing

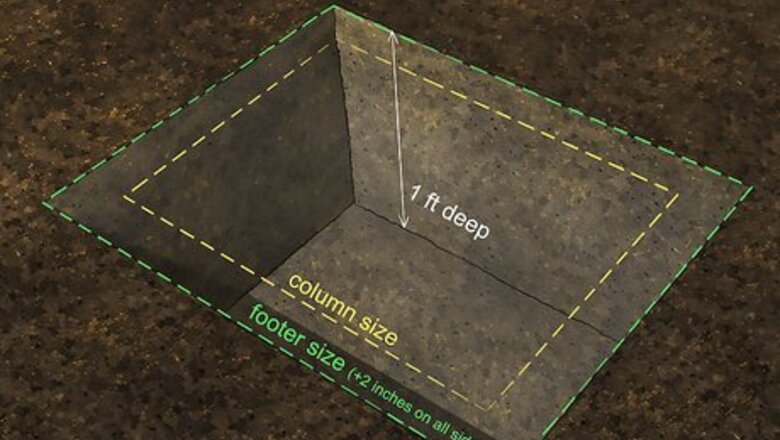
Dig a square, level hole where you want your brick column to go. This is where the footing, or foundation, of your column will be. It's important that you build the footing down into the ground as opposed to on the surface so that your column is stable. The depth and dimensions of the hole will depend on several factors, like the size of your column, how much weight it will support, and the kind of ground you're building on. If you're not sure, do some research online or consult with a professional mason. As a rule of thumb, the hole should be at least 12 inches (30 cm) deep. Make sure the hole is at least 4 inches (10 cm) longer and wider than your column will be so you have enough room to build the footing. Verify that the bottom of the hole you dug is level before you proceed. If it's not level, your brick column won't be either, so you'll want to level it first.

Make a frame that's 4 inches (10 cm) longer and wider than the column will be. Cut a wooden plank or stud into 4 pieces—1 piece for each side of the frame—and nail them together to make a square frame. Then, place the frame in the hole you dug so it's laying flat on the bottom of the hole. Since you'll be using the empty inside of the frame to make your footing, make sure the frame is 4 inches (10 cm) longer and wider than your column will be when measured from the inside edges of the wood and not the outside edges. For example, if you want to build a concrete column that's 24 by 24 inches (61 cm × 61 cm), you'd want to make a frame that's 28 by 28 inches (71 cm × 71 cm) when measured from the inside edges of the frame.
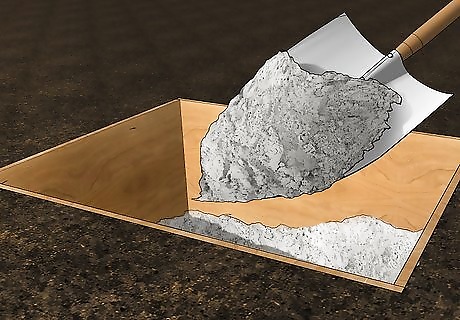
Fill the frame with concrete and let it dry completely. Once you've poured the concrete, take a piece of wood and drag it across the surface of the frame to scrape off any excess concrete and smooth out the surface so it's level for your column. Then, wait for the concrete to dry. How long it takes for the concrete to dry will depend on the type of concrete you use. Some concrete can take weeks to fully cure, while others are designed to dry in a few hours. If you want to speed up your project, try using a fast-setting concrete mix so you can pour the concrete and start working on your column all on the same day. Alternatively if the column isn't load-bearing or very tall, you can later bricks and more in an area 18 inches (46 cm) deep and 4 inches (10 cm) wider than the column. The size of your foundation depends on how high you want to make your column. For example, if you're making a 2 ft (0.61 m) column, pour an 8 in (20 cm) concrete foundation and put in rebar facing upwards in the concrete. On top of the rebar, place cinder blocks before laying the brick on top of it.
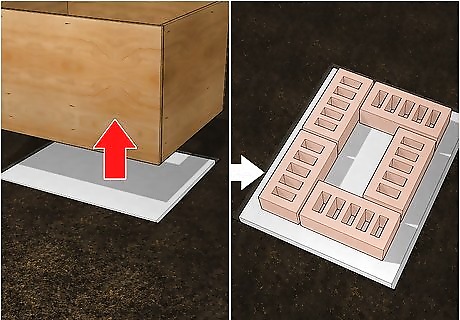
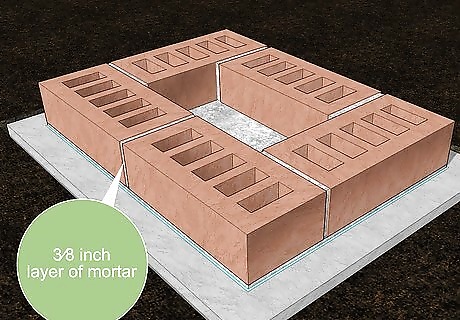
Remove the wooden frame and dry-lay the first course of bricks you'll be using. Dry-laying your bricks is just arranging them on the footing in the pattern you'll be using without actually securing them to the footing with mortar. Simply take all the bricks you'll use for the first course (the first layer of your column) and lay them on top of the footing so the ends are touching and they form a square or rectangle. Don't put a brick in the center of the course since the center of your brick column will be hollow. Also, leave a ⁄8 inch (0.95 cm) space between each neighboring brick so you can connect them with mortar later on. When the bricks are centered on the footing, there should be 4 inches (10 cm) of footing extending off of each side.

Trace the outer and inner edges of the course, then remove the bricks. Use a pencil to trace all around the outer edge of the course and then along the inner edge of the course so you're left with 2 rectangles or squares, 1 inside of the other. This will give you an outline to use when you spread the first layer of mortar on the footing. When you reach a gap between the bricks, just draw a straight line across the gap to the next brick as if the gap wasn't there.
Laying the Bricks
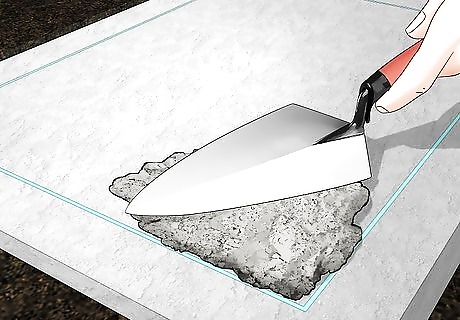
Spread a ⁄8 inch (0.95 cm) layer of mortar inside the lines on the footing. Use a trowel to apply the mortar to the footing, and try to stay inside the reference lines as much as possible. However, it's OK if you go outside of the lines a little bit—you can always scrape the mortar off later before it dries. Don't apply any mortar to the center of the footing, which is outside of the outline you drew. You only want to apply mortar where you'll be laying bricks. The center of the footing is where the inside of your column will be, which will be hollow. Wear long pants and sleeves when working with mortar since it can irritate your skin.
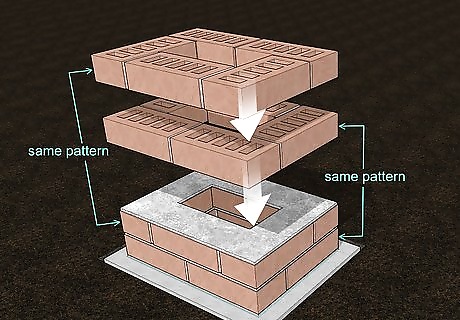
Lay the first course of bricks on top of the mortar. Take the same bricks you used to dry-lay and mark the footing and set them on the mortar in the same pattern you did before. Before you lay each brick, spread a ⁄8 inch (0.95 cm) layer of mortar on the end that will be joined with the next brick in the pattern. When you're finished, all of the bricks should be connected with mortar and evenly spaced apart. You want to make sure that you're applying an even layer of mortar to each brick so that your column has a uniform, balanced appearance when it's finished. Make a weep hole in the base layer of bricks by coating a pencil with vegetable oil and inserting it into one of the bottom mortar joints. Pull the pencil out once the mortar is dry. This helps drain any moisture that may accumulate inside your column.

Repeat with the second course of bricks, but rotate the pattern 180 degrees. First, spread a ⁄8 inch (0.95 cm) layer of mortar on top of the first course of bricks using the trowel. Then, take the same number of bricks as you used for the first course and place them on the mortar in the same pattern, just rotated 180 degrees. This will give your brick column the alternating pattern that is typically used in brick structures. For example, if you're staring down at your first course of bricks and there are 2 horizontal bricks on top, 1 vertical brick on each side, and 1 horizontal brick on the bottom, you would lay the second course of bricks so there are 2 horizontal bricks on the bottom, 1 vertical brick on each side, and 1 horizontal brick on top.
Continue adding courses and rotating the brick pattern after each course. The number of courses you add depends on how tall you want your brick column to be. Just remember to always rotate the pattern 180 degrees after each course of bricks you lay. Make sure you maintain a consistent thickness with the mortar you apply between courses and bricks.
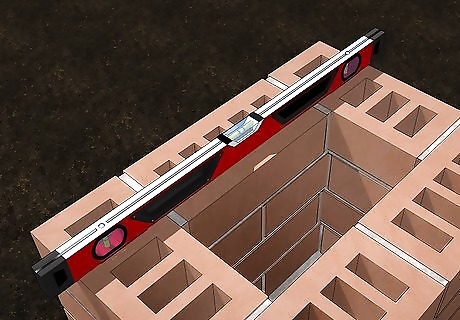
Check the column with a level after every other course. If the bricks aren't level, you want to catch it early on so you don't compound the issue and realize your column is off once the mortar is already dry. To check if the column is level, hold a level against each side, including the top. If something isn't level, tap or push the bricks into the right position with the butt end of your trowel and then check them with the level again. Run strings in each corner of your column from the bottom to the top and make sure they're straight with a level. This way you can make sure your bricks are straight and level as you build them up. Don't add another course until you're certain all of the existing bricks are level.
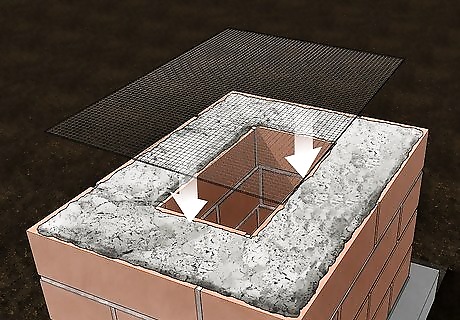
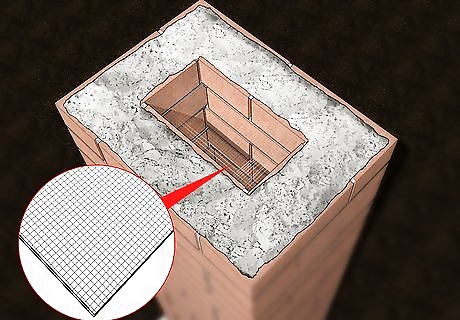
Add a strip of ⁄4 inch (0.64 cm) thick wire mesh after every fourth course. Wire mesh will add extra support that can help your brick column withstand heavier loads. To add the mesh, cut a strip that's as long and wide as the column. Then, apply a thin layer of mortar over the top course of bricks and lay the mesh over it. Finally, apply another thin layer of mortar over the top of the mesh before adding the next course. You can find wire mesh online or at your local hardware store.

Smooth out any hardened mortar joints after every fifth course. When you finish laying every fifth course, test all of the mortar joints on the column by pressing your finger into them. If any of the joints resist minimal pressure, they're hard enough to be smoothed out. Just take a jointing tool and go over those joints with it to scrape off the excess mortar. When you're finished, the joints should appear flush with the bricks. Make sure you do this after every fifth course. Otherwise, some of the joints could harden too much, and you might not be able to smooth them out. Use a masonry brush to clean your bricks as you build up so they look neater.
Adding the Final Course
Add a layer of mortar and wire mesh before the final course of bricks. Apply the mesh as you did throughout the rest of the column. Just spread a thin layer of mortar over the top course, put down the mesh, and top it with another thin layer of mortar. Don't skip this step. You'll need the wire mesh to help support the final course of bricks, which will have an extra brick in it.

Lay the final course of bricks, but add an extra brick in the center this time. Since this will be the top of your brick column, you want to cover the hole in the center so it's not visible. To add the center brick, wait until you've put down the first 2 bricks in the final course. Then, lay the center brick and finish the rest of the course.
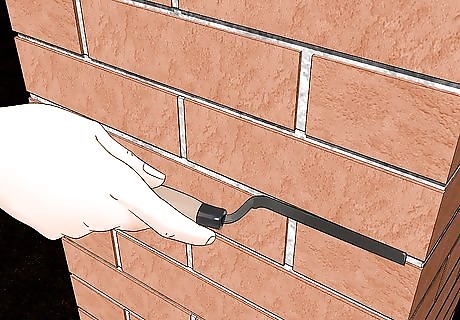
Smooth out any remaining joints before the mortar dries. If there are any joints you haven't smoothed out yet, wait until they harden to the point where they resist minimal pressure. Then, use your jointing tool to scrape off the excess mortar so they're flush with the bricks. Be careful you don't wait too long or the mortar could dry and you'll lose your chance to smooth out the joints.

Top your brick column with a capstone if you want a polished finish. A capstone can be brick, concrete or stone, and it's put on top of a brick column to give it a nice, finished appearance. If you're interested in adding a capstone to your column, get one that's around 3 inches (7.6 cm) longer and wider than the column. Then, spread a layer of mortar on top of the column and center the capstone on top of it. You can also make a brick capstone by using bricks that are larger than the ones you used in your column. Cut your bricks in half and lay them with their sides facing out for added strength and visual appeal.


Comments
0 comment