
views
Building Muscle and Managing Your Weight

Join a local wrestling team or club. Unlike some other sports, wrestling doesn’t work as a solitary endeavor; it must be practiced with others. Participating in wrestling at a local club will also allow you to work with peers at your level, and will let you train with an experienced coach. This gives you the opportunity to watch everything the coach does closely, and learn from their instruction. To find a wrestling gym near you, check out the list of clubs sponsored by Team USA online.
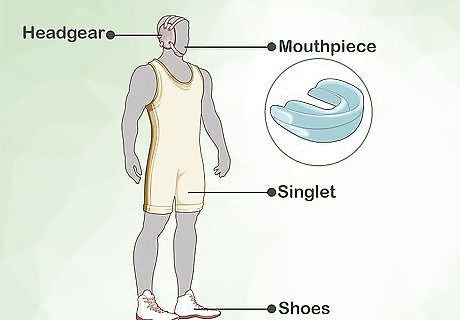
Purchase or borrow the requisite gear. Unlike some other sports, you can’t participate in wrestling unless you have the right clothing and safety gear. The primary things you’ll need are: a mouth guard, a singlet, wrestling shoes, and protective head gear. A singlet is a one-piece article of clothing which covers the body down to mid-thigh. You may be able to find these items at large sporting goods stores or at a wrestling-specific outfitter. If not, you can purchase them through large online retailers. For physical protection, in addition to the headgear and mouth guard, consider investing in an athletic support or a sports bra. If you menstruate, consider investing in some sports tampons.
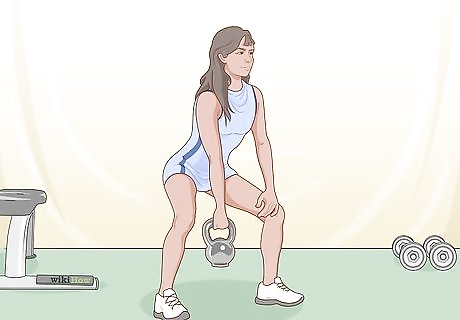
Perform strength-building exercises to build muscle tone. Wrestling is a physically demanding sport, although new wrestlers often don't understand that until they've entered the mat. Cardio and strength workouts are the best way to prepare your body for the sometimes-grueling experience of wrestling. Wrestlers of any age can train with kettle bells, medicine balls and push-ups, while adult wrestlers can build strength through free weights. Try to hit the gym at least 3 or 4 times a week for at least 30 minutes each time. If you’re inexperienced, talk to your coach or doctor for a safe workout schedule.
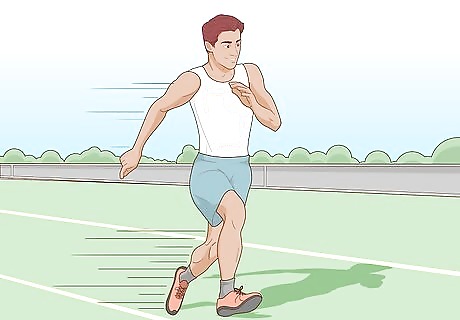
Work off some body fat with cardio. This will allow you to compete in a lower weight class, which is important if you plan to be a competitive wrestler. Cardio exercises include any that raise your heartbeat and cause you to sweat, like jumping rope, running (or jogging) on a treadmill, or swimming. Cardio training in short, intense bursts will also help you prepare for the fast-paced intensity of a wrestling match. When you’re training for wrestling, plan to do cardio work at least 3 times a week. Start out by exercising for 20 minutes.

Eat at a healthy level, especially if you’re a young wrestler. As you improve at wrestling and move into more competitive matches, you’ll need to talk to your coach and find out what weight class you fit into. Once you have this information, it can be tempting to reduce your daily calorie intake so that you can enter a lower weight class. However, depriving your body of food can have a negative effect on your health. On average, an active adult woman needs to consume about 1,900 calories per day, while an active adult man needs about 2,500 calories per day. Frequently denying your body food when you’re hungry can eventually lead to an eating disorder.
Mastering Your Stance and a Defensive Move
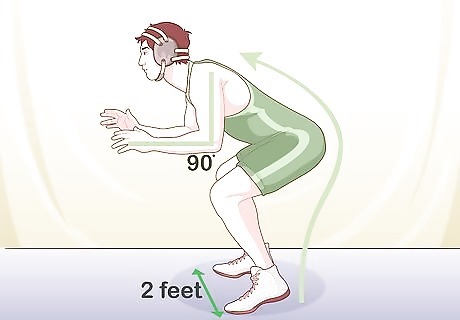
Master the square stance. This stance is the neutral position from which you’ll start nearly all of your offensive and defensive moves. Start from a standing position. Separate your feet by about 2 feet (0.61 m). Then, bend your knees and slightly arch your back so you’re ready to spring in any direction. Lastly, bend your elbows at about 90° and put your hands in front of you. A common alternative to this is the staggered stance. In a staggered stance, one foot is about 8 inches (20 cm) in front of the other and carries the majority of your weight. When in either stance, your elbows should be between your thighs. If your elbows stray outside of them, your opponent may under hook your elbows.
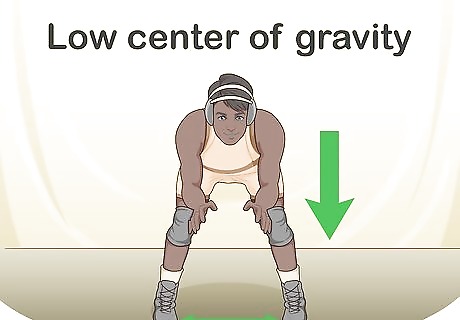
Keep a low center of gravity. Keeping your legs wide and your torso low to the ground will help with this. So, keep your weight spread between both of your feet and always stay balanced on the balls of your feet. Get used to moving around in this crouched position, while maintaining the standard wrestling stance. Maintaining a low center of gravity will make it difficult for an opponent to topple you over.
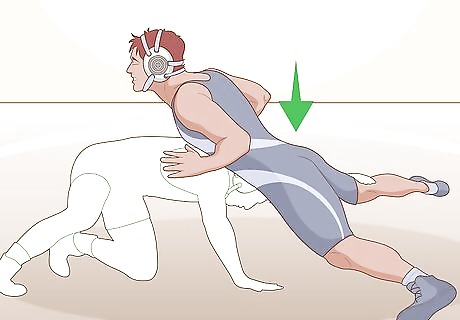
Learn to sprawl to move your legs out of an opponent’s range. Sprawling is simply falling to your hip from your stance in order to prevent your opponent from performing a takedown move. When your opponent takes their shot at your leg(s), lower your hips, then drop to one knee and drop your hip on top of your opponent’s upper back. Push your opponent’s head down to the mat with one hand. This will prevent them from performing a takedown. The sprawl moves your legs out of range from someone shooting on you. This is a great way to defend against an opponent, and opens the best options to counter-attack.
Learning Standard Offensive Moves
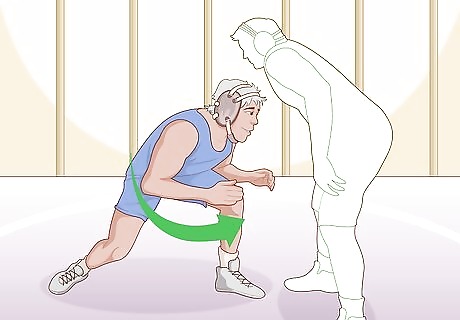
Practice your drop steps to get inside your opponents’ defenses. First, get into a staggered stance. Second, lower your body and take a step with your dominant foot. Third, fall to your dominant leg's knee and drag your non-dominant leg in front of your body. Finally, come to a knee with your non-dominant leg extended in front of you. If you are a right handed, you should end up on your right knee. The drop step is a move which allows you to penetrate your opponent’s defenses and move in close to them. At this point, you’ll begin to grapple and attempt to pin them.
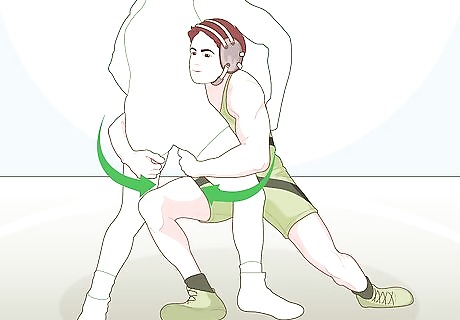
Learn the double-leg takedown. Start from your staggered stance, then move towards your partner with a drop step. Your leading leg should be on the inside of your partners legs and your non-dominant leg should be on the outside. Your right hand should be grasped onto the back of your opponent’s left thigh and your left hand should be on the back of their right thigh. Once your hands are in place, stand up and dig your head into your opponents hip. Try to drive them off balance. If you are not strong enough to topple your opponent in a single move, you can still drive your opponent with your head on his hip. They will eventually lose their balance and fall.
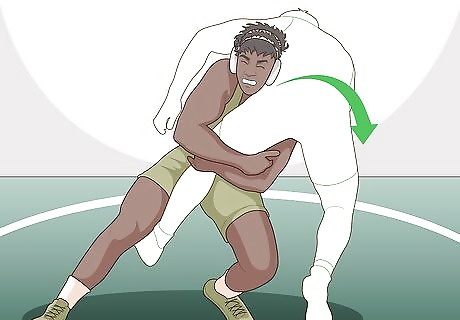
Train to perform a single-leg takedown. Identify which of your opponent’s legs is closest to you. Stay low, and perform a drop step to move in close to the leg. Wrap both arms around the leg, and clasp your hands so they’re locked together. (This part of the move is called the “shot.”) To take your opponent down, stand up and push your head into your opponent’s chest. At the same time, lift your opponent’s leg so they’re standing on only 1 foot (0.30 m). From here you can exert more pressure on the opponent’s raised leg to topple them over backwards. This is a standard takedown move that all wrestlers should master, although it’s more difficult than the double-leg takedown.
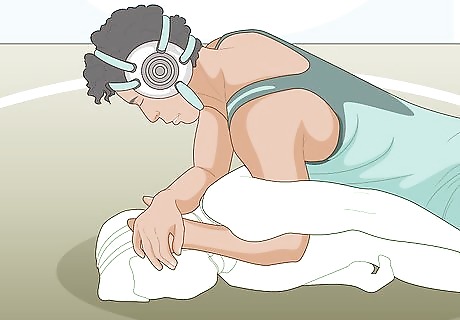
Pin your opponent to the mat with a half nelson. Once you’ve performed a takedown (or after you’ve countered an opponent with a sprawl), you’re ready to pin them. Begin this move when your opponent is face-down on the mat. Move your dominant arm beneath one of your opponent’s arms, so it’s threaded through their armpit. Set the palm of your dominant hand on the back of the opponent’s neck, and push their head down into the mat. Then use your arm to lift up the opponent’s should so they’re immobile. To prevent your opponent from standing up, move your body to the side of their and use your weight to pin their legs down. Tom Jarman Tom Jarman, Wrestling Coach Avoid trying to 'tough it out' and wrestle through minor injuries or pain. Small issues like muscle strains can worsen quickly under continuous stress. Tell your coach immediately if you feel any unusual pain during training or competition. It's better to rest and recover properly than to exacerbate an injury that could sideline you for a long time.




Comments
0 comment