StepsLearning Basic HTML
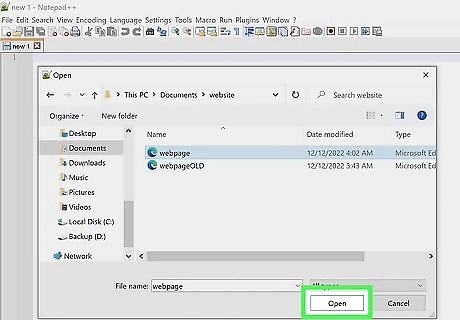
Open an HTML document. Most text editing programs, including Notepad or Notepad++ for Windows, TextEdit for Mac, and gedit for GNU/Linux can be used to write HTML documents. Open a new document and use File → Save As in the top menu to save it as a "Web Page," or to change the file extension to ".html" instead of ".doc," ".rtf," or any other extension.
You may see a warning that your document will be changed to "plain text" instead of "rich text," or that special formatting and images won't be saved properly. This is fine; HTML documents do not use those options.
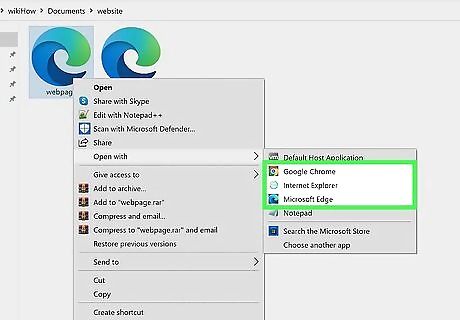
View your document with an internet browser. Save your blank document, then find the document icon in your computer and double click to open it. It should open as a blank web page in your browser. If it doesn't, drag the file icon to the URL (address) bar of your browser. As you edit your HTML document in this tutorial, you can keep checking back and seeing how your web page changes.
Note that this does not actually create a website online. It will not be accessible by other people, and you do not need an internet connection to test out. This just uses a browser to "read" your HTML document as though it were a website.
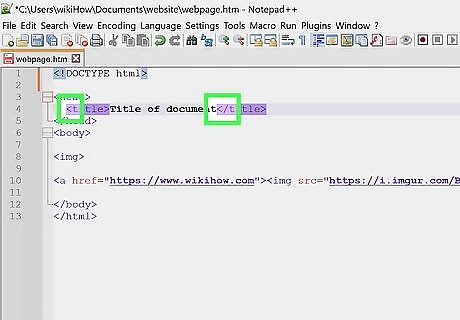
Understand markup tags. Markup tags do not show up on a web page like normal text. Instead, they tell your web browser how to display the page and its content. The "start tag" contains instructions. For example, it might tell the browser to display text as bold. You also need an "end tag" to let the browser know where the instructions apply: in this example, all text between the start tag and the end tag will be bold. Write end tags inside angle brackets as well, but start with a slash after the first bracket.
Write start tags in between angle brackets:
Write end tags in between angle brackets, but put a slash after the first bracket: )
Keep reading to learn how to write functional markup tags. For this step, all you need to remember is the basic format they are written in: < > and
If you are using other HTML tutorials as well, you might see them refer to the tags as "elements" and the text in between start and end tags as "element content."
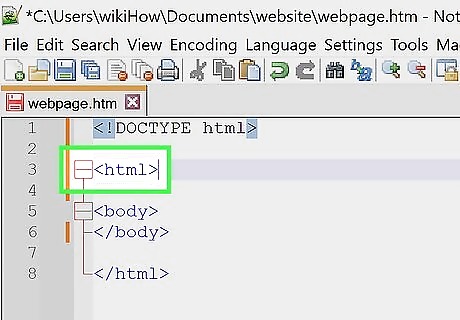
Write your first tag. Every html document starts with a tag and ends with a tag. This tells the browser that everything between these tags is in HTML. Add these tags to your document:
Often, HTML files are started with a line that indicates that the file as a whole should be read as a HTML file by browsers. It isn't needed, but may help resolve compatibility issues.
Write at the top of your document.
Hit enter or return several times to give yourself some space, then write
Remember to write everything else in this tutorial in between these two tags.
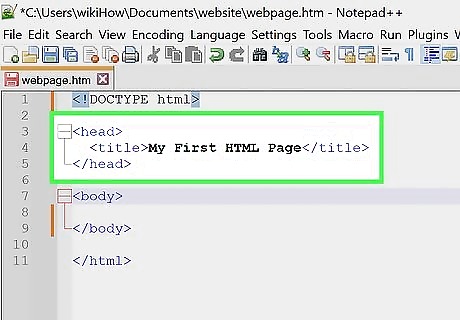
Fill out the
portion of your document. In between the and tags, write a start tag and a end tag. Give yourself space to write between them. Everything in between these head tags won't actually be displayed on the page itself. Try the following and see where it shows up instead:
In between the and tags, write and
In between the and tags, write How to Learn HTML - wikiHow.
Save the document and open it in a browser (or save the document, then refresh the browser page if it's already open.) Do you see what you wrote at the top of the browser, above the address bar?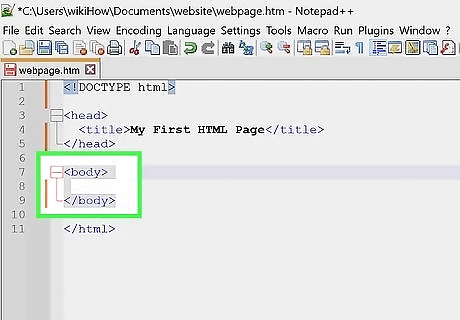
Create a
section. Everything else in this beginner document will go in a body section, which actually gets displayed on the web page. After the end tag, but before the tag, write and . For the rest of this tutorial, everything you write will go in between these body tags. You should now have a document that looks like this:How to Learn HTML - wikiHow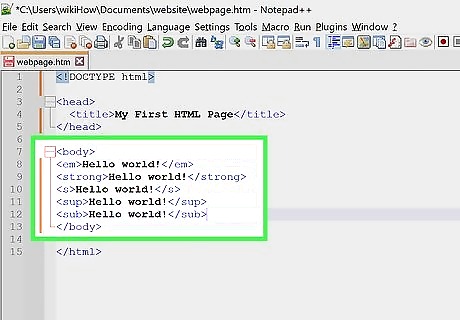
Add text in various styles. Now it's time to write something you can actually see in your browser! Anything you write within the body tags will show up in your browser after you save the HTML document and refresh the browser page. Don't write anything with the < or > symbols, however, since your browser will try to interpret it as an HTML instruction instead of normal text. Try writing Hello world! (or anything else you like), then add these new tags around it and see what happens each time:
Hello world! will show up as "emphasized text:" Hello world!
Hello world! will show up as "strong text:" Hello world!
Hello world! will show up with a strikethrough: Hello world!
Hello world! will show up as superscript:
Hello world! will show up as subscript: Hello world!
Try combinations of these: What does Hello world! look like?
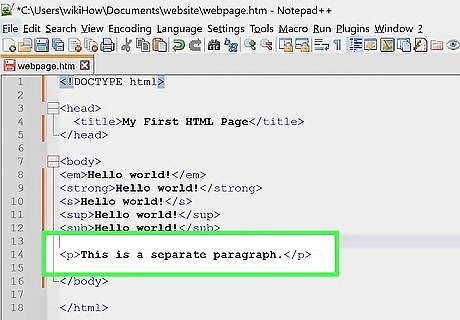
Divide your text into paragraphs. If you try to write several lines of text in your HTML document, you might notice that the line breaks don't show up in your browser. You have to code these in yourself:
This is a separate paragraph.
This sentence is followed by a line break.
before this sentence begins.This is the first tag you've seen that doesn't need an end tag! These are called "empty tags."
Make headings to display the names of sections:header text
: the largest headerheader text
(the 2 level header)header text
(the 3 level header)header text
(the 4 level header)header text
(the smallest header)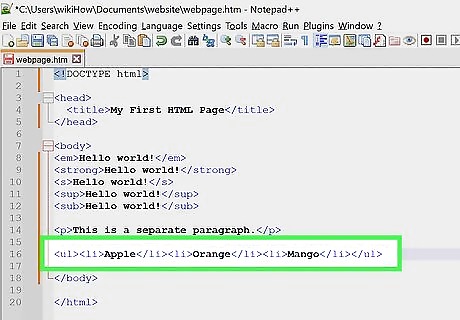
Learn how to make lists. There are several different ways to write lists on your webpage. Try out the following types of code and see which one you like. Note that one pair of tags goes around the whole list (such as the
tags for "unordered list"), while individual items on the list are surrounded by another pair of tags, such as and.
Use this code to make bulleted lists:- One item
- Another item
- Another item
Or this code to make numbered lists:- Item 1
- Item 2
- Item 3
Or this code to make a list defining terms:- Coffee
- - Hot Beverage
- Leite
- - Cold Beverage
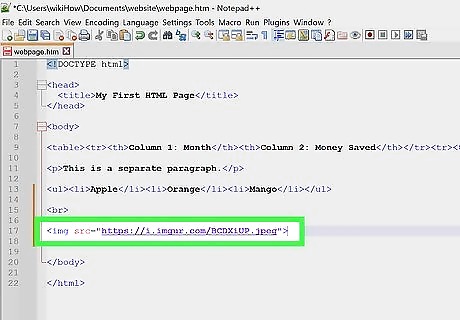
Spruce up your page with line breaks, horizontal lines, and images. Now it's time to try adding things besides text to your page. Try out the following tags, or click the links for more information. You'll need to use an online image hosting service so you have a URL to link to in the image tag:
Insert a Line in HTML:
or
Add images: 
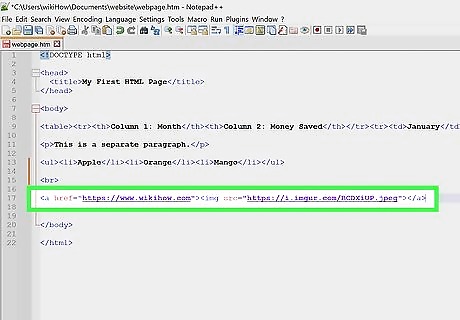
Link to other places on the page. You can also use this code to link to other pages and websites, but for now, since you may not have a web site yet, we'll focus on "anchors," or specific places on the page that you can link to:
First make an anchor with the tag at the point on the page that you want to link to. Name it something descriptive and easy to remember.:This is the text you put the anchor around.[https://www.youtube.com/watch?v=UB1O30fR-EE 4 times
]
Use the to link to those anchors or to another webpage:Write the text or image that will be displayed as a link here.
To link to an anchor on a different web page, add the # sign after the URL, followed by the name of the anchor. For instance, https://www.wikihow.com/Learn-HTML#Tips links to the Tips section of this page.
Learning More Advanced HTML
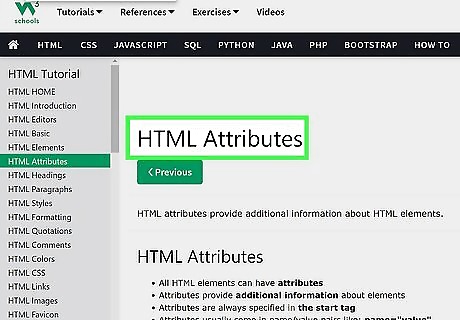
Learn about attributes. Attributes are placed within the tag itself, making additional alterations to the "element content" between the start and end tag. They never stand alone. They are written in the format name="value", where name is the name of the attribute (for instance "color"), and value describes this specific instance (for instance "red").
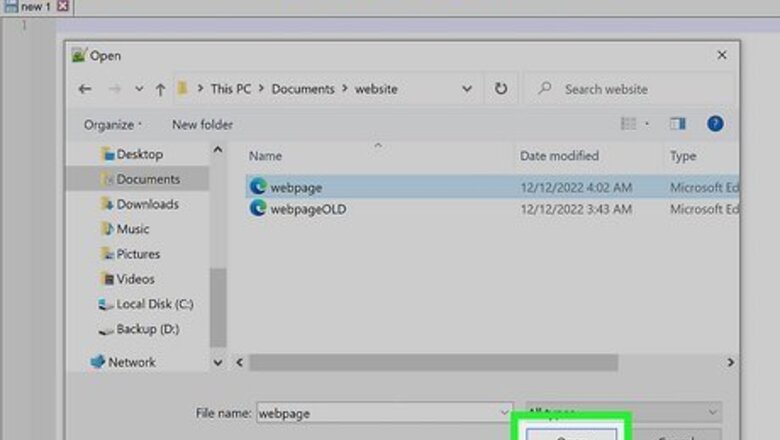
You've actually seen attributes before, if you followed the tutorial in the basic HTML section. ![]() tags use the src attribute, anchors use the name attribute, and links use the href attribute. See how those all follow the ___="___" format?
tags use the src attribute, anchors use the name attribute, and links use the href attribute. See how those all follow the ___="___" format?
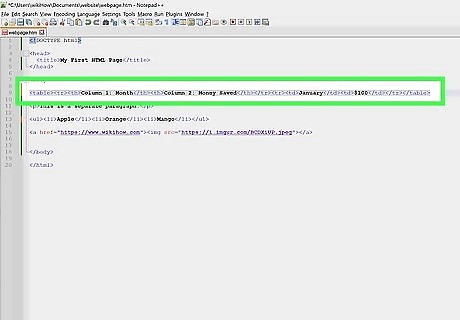
Experiment with HTML tables. Making a table, or chart, requires several different tags. Play with these tags, or learn about HTML tables in more detail.
Start with table tags around the entire table:
Row tags around the contents of each row:
Column headers in the first row: |
Cells in subsequent rows: |
Here's an example of how it all fits together:| Column 1: Month | Column 2: Money Saved |
|---|
| January | $100 |
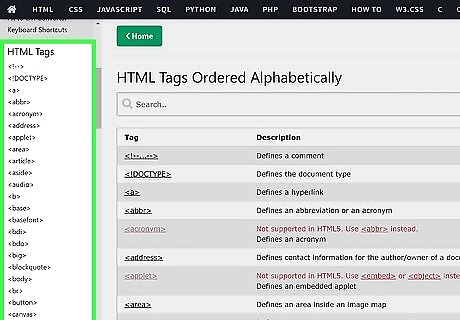
Learn the miscellaneous head tags. You've already learned the tag, which shows up at the start of each document. Besides the tag, it can include the following types of tags:
Meta tags, which are used to provide metadata about a web page. This data can be used by search engines when the robot scours the internet to locate and list websites. To make your website more visible on search engines, use one or more <meta> start tags (no end tags necessary), each with exactly one name attribute and one content attribute, for example: <meta name="description" content="write a description here">; or <meta name="keywords" content="write a list of keywords, each separated by a comma">
<link> tags are used to associate other files with the page. This is mainly used to link to CSS stylesheets, which are made using a different type of coding to alter your HTML page by adding color, aligning your text, and many other things.
<script> tags are used to link the page to JavaScript files, which can cause the page to change as the user interacts with it.</p><p><img style="display: block; margin-left: auto; margin-right: auto;" src="https://cdn.rawisda.com/news/d4/de/20/d4de200ab7b8054f8434cc11addf4efc-entry-14.jpg" width="718" height="477" /></p><p>Play around with HTML found on websites. A great way to expand your knowledge is by looking into the HTML source of webpages. You can do this by right clicking the page and selecting "View Source," "View Page Source," or a similar option, or by going to the View section in the top menu of your browser. Try to figure out what each unfamiliar HTML tag does, or look it up online for the answer.
While you cannot edit other people's web sites, you can copy the HTML you find into your own document, then play with it to see what different options do. Note that, without the CSS stylesheet that website links to, you may not be able to see all of the colors or formatting.</p><p><img style="display: block; margin-left: auto; margin-right: auto;" src="https://cdn.rawisda.com/news/6b/13/8e/6b138e7ce984a1023ccfe5c1c9780096-entry-15.jpg" width="718" height="477" /></p><p>Learn more advanced web design from comprehensive guides. There are various resources on the internet that you can use to learn about many more HTML tags, such as W3Schools or Codecademy. You may also find books with tutorials about HTML, but make sure you use one that was published within the last couple years, since there are occasional updates and changes. Better yet, learn CSS to have much more control over your web page's layout and appearance. Once you have CSS down, the next step for web designers is typically Javascript.</p>
<div class="clear"></div>
</section>
</div>
<div class="content-tags hide-mobiles">
</div>
<div class="buzz-author-box center-items clearfix">
<div class="buzz-author-image">
<a href="https://rawisda.com/profile/newsflash">
<img src="https://cdn.rawisda.com/avatars/3e/c6/9a/3ec69a7a33ca80d329ed11621b144e2a-b.jpg" class="avatar" width="90" height="90"
alt="NewsFlash">
</a>
</div>
<div class="buzz-author-info">
<div class="buzz-author-box-name">
<h3 class="buzz-author-name fn">
<a href="https://rawisda.com/profile/newsflash">
NewsFlash
</a>
</h3>
<div class="buzz-author-actions">
<div class="following_area181">
<a class="button button-white button-small" href="https://rawisda.com/login" rel="get:Loginform">
<i class="fa fa-user-times"></i> Follow
</a>
</div>
</div>
</div>
<div class="buzz-author-description">
</div>
<div class="buzz-author-social">
<div class="social_links only_icons">
</div>
</div>
</div>
</div>
<section class="user-reactions" id="reactions78299">
<div class="colheader sea">
<h3 class="header-title">What's your reaction?</h3>
</div>
<div class="clear"></div>
<div class="percentage-bar">
<div class="reaction-emoji">
<div class="bar">
<span class="reaction-percent-bar count f" data-percent="0">
<span class="count-text">0</span>
</span>
</div>
<a class="postable" rel="nofollow" href="javascript:void();" data-method="Post" data-target="reactions78299" data-href="https://rawisda.com/reactions/awesome/78299">
<img alt="AWESOME!" src="https://rawisda.com/assets/images/reactions/awesome.gif" width="50" height="50">
<span class="text">AWESOME!</span>
</a>
</div>
<div class="reaction-emoji">
<div class="bar">
<span class="reaction-percent-bar count f" data-percent="0">
<span class="count-text">0</span>
</span>
</div>
<a class="postable" rel="nofollow" href="javascript:void();" data-method="Post" data-target="reactions78299" data-href="https://rawisda.com/reactions/nice/78299">
<img alt="NICE" src="https://rawisda.com/assets/images/reactions/nice.png" width="50" height="50">
<span class="text">NICE</span>
</a>
</div>
<div class="reaction-emoji">
<div class="bar">
<span class="reaction-percent-bar count f" data-percent="0">
<span class="count-text">0</span>
</span>
</div>
<a class="postable" rel="nofollow" href="javascript:void();" data-method="Post" data-target="reactions78299" data-href="https://rawisda.com/reactions/loved/78299">
<img alt="LOVED" src="https://rawisda.com/assets/images/reactions/loved.gif" width="50" height="50">
<span class="text">LOVED</span>
</a>
</div>
<div class="reaction-emoji">
<div class="bar">
<span class="reaction-percent-bar count f" data-percent="0">
<span class="count-text">0</span>
</span>
</div>
<a class="postable" rel="nofollow" href="javascript:void();" data-method="Post" data-target="reactions78299" data-href="https://rawisda.com/reactions/loL/78299">
<img alt="LOL" src="https://rawisda.com/assets/images/reactions/lol.gif" width="50" height="50">
<span class="text">LOL</span>
</a>
</div>
<div class="reaction-emoji">
<div class="bar">
<span class="reaction-percent-bar count f" data-percent="0">
<span class="count-text">0</span>
</span>
</div>
<a class="postable" rel="nofollow" href="javascript:void();" data-method="Post" data-target="reactions78299" data-href="https://rawisda.com/reactions/funny/78299">
<img alt="FUNNY" src="https://rawisda.com/assets/images/reactions/funny.gif" width="50" height="50">
<span class="text">FUNNY</span>
</a>
</div>
<div class="reaction-emoji">
<div class="bar">
<span class="reaction-percent-bar count f" data-percent="0">
<span class="count-text">0</span>
</span>
</div>
<a class="postable" rel="nofollow" href="javascript:void();" data-method="Post" data-target="reactions78299" data-href="https://rawisda.com/reactions/fail/78299">
<img alt="FAIL!" src="https://rawisda.com/assets/images/reactions/fail.gif" width="50" height="50">
<span class="text">FAIL!</span>
</a>
</div>
<div class="reaction-emoji">
<div class="bar">
<span class="reaction-percent-bar count f" data-percent="0">
<span class="count-text">0</span>
</span>
</div>
<a class="postable" rel="nofollow" href="javascript:void();" data-method="Post" data-target="reactions78299" data-href="https://rawisda.com/reactions/omg/78299">
<img alt="OMG!" src="https://rawisda.com/assets/images/reactions/wow.gif" width="50" height="50">
<span class="text">OMG!</span>
</a>
</div>
<div class="reaction-emoji">
<div class="bar">
<span class="reaction-percent-bar count f" data-percent="0">
<span class="count-text">0</span>
</span>
</div>
<a class="postable" rel="nofollow" href="javascript:void();" data-method="Post" data-target="reactions78299" data-href="https://rawisda.com/reactions/ew/78299">
<img alt="EW!" src="https://rawisda.com/assets/images/reactions/cry.gif" width="50" height="50">
<span class="text">EW!</span>
</a>
</div>
</div>
</section>
<div class="content-comments">
<div id="comments-wrapper">
<div class="colheader sea">
<h3 class="header-title">Comments</h3>
</div>
<!-- add comment -->
<div id="addComment" class="add-comment">
<form action="#" method="post" data-prepend="yes"
onsubmit="return false;" onSubmit="return false;">
<div class="loader-ajax"></div>
<div class="add-comment-container">
<img src="https://rawisda.com/assets/images/user-avatar-s.jpg" alt="https://rawisda.com/assets/images/user-avatar-s.jpg" class="usericont" />
<div class="add-comment-form">
<div>
<textarea data-href="https://rawisda.com/login" rel="get:Loginform" name="comment_text" cols="30" rows="10"
placeholder="You must have to login to post a comment."></textarea>
<div class="add-comment-form-actions">
<button type="submit" class="add_new_comment">
<div class="add-comment-loading"><img src="https://rawisda.com/assets/images/ajax-loader.gif"></div>
<span>Comment</span>
</button>
<div class="add-comment-action-inputs">
</div>
</div>
</div>
</div>
</div>
</form>
</div>
<!-- comments -->
<div id="comments">
<div class="comment-heading allcomments">
<h3 class="header-title">
<span>0 comment</span>
</h3>
<div class="comment-short comment_sort">
<a href="javascript:void(0);" data-sort="best">Best</a>
<a href="javascript:void(0);" data-sort="old">Oldest</a>
<a href="javascript:void(0);" class="active" data-sort="new">Newest</a>
</div>
</div>
<div class="comments">
<div class="form-loader"></div>
<div id="comments_list">
<div class="no-comment">Write the first comment for this!</div>
</div>
</div>
</div>
</div>
</div>
</div>
</div>
<div class="clear"></div>
</article>
</div>
<div class="content-spinner">
<svg class="spinner-container" width="45px" height="45px" viewBox="0 0 52 52">
<circle class="path" cx="26px" cy="26px" r="20px" fill="none" stroke-width="4px"></circle>
</svg>
</div>
</div>
<div class="sidebar hide-mobile">
<div class="sidebar--fixed">
<div class="sidebar-block clearfix">
<div class="colheader rosy">
<h3 class="header-title">Today's Top <span>Posts</span></h3>
</div>
<br>
<ol class="sidebar-mosts sidebar-mosts--readed">
<li class="sidebar-mosts__item ">
<a class="sidebar-mosts__item__link" href="https://rawisda.com/tennis/taylor-fritz-downs-kei-nishikori-to-storm-into-atp-atlanta-open-2023-semifinal-1215" title="Taylor Fritz Downs Kei Nishikori to Storm Into ATP Atlanta Open 2023 Semifinal">
<figure class="sidebar-mosts__item__body">
<div class="sidebar-mosts__item__image">
<img class="sidebar-mosts__item__image__item lazyload"
src="https://rawisda.com/assets/images/preloader.gif"
data-src="https://cdn.rawisda.com/news/d1/9e/8b/d19e8bb68898fe6483171b85748cf488-s.jpg" alt="Taylor Fritz Downs Kei Nishikori to Storm Into ATP Atlanta Open 2023 Semifinal"
width="300" height="169">
</div>
<figcaption class="sidebar-mosts__item__caption">
<div class="sidebar-mosts__item__view">
<span
class="sidebar-mosts__item__view__count">4</span>
<span class="sidebar-mosts__item__view__icon"><i
class="material-icons"></i></span>
</div>
<h3 class="sidebar-mosts__item__title">Taylor Fritz Downs Kei Nishikori to Storm Into ATP Atlanta Open 2023 Semifinal</h3>
</figcaption>
</figure>
</a>
</li>
<li class="sidebar-mosts__item ">
<a class="sidebar-mosts__item__link" href="https://rawisda.com/how-to/your-ultimate-guide-to-superhero-logos-symbols-90657" title="Your Ultimate Guide to Superhero Logos & Symbols">
<figure class="sidebar-mosts__item__body">
<div class="sidebar-mosts__item__image">
<img class="sidebar-mosts__item__image__item lazyload"
src="https://rawisda.com/assets/images/preloader.gif"
data-src="https://cdn.rawisda.com/load/8025e59b316956895f7aef2bebb97492-s.jpg" alt="Your Ultimate Guide to Superhero Logos & Symbols"
width="300" height="169">
</div>
<figcaption class="sidebar-mosts__item__caption">
<div class="sidebar-mosts__item__view">
<span
class="sidebar-mosts__item__view__count">2</span>
<span class="sidebar-mosts__item__view__icon"><i
class="material-icons"></i></span>
</div>
<h3 class="sidebar-mosts__item__title">Your Ultimate Guide to Superhero Logos & Symbols</h3>
</figcaption>
</figure>
</a>
</li>
<li class="sidebar-mosts__item ">
<a class="sidebar-mosts__item__link" href="https://rawisda.com/how-to/best-reverse-harem-anime-list-30-popular-shows-90656" title="Best Reverse Harem Anime List: 30 Popular Shows">
<figure class="sidebar-mosts__item__body">
<div class="sidebar-mosts__item__image">
<img class="sidebar-mosts__item__image__item lazyload"
src="https://rawisda.com/assets/images/preloader.gif"
data-src="https://cdn.rawisda.com/load/8025e59b316956895f7aef2bebb97492-s.jpg" alt="Best Reverse Harem Anime List: 30 Popular Shows"
width="300" height="169">
</div>
<figcaption class="sidebar-mosts__item__caption">
<div class="sidebar-mosts__item__view">
<span
class="sidebar-mosts__item__view__count">2</span>
<span class="sidebar-mosts__item__view__icon"><i
class="material-icons"></i></span>
</div>
<h3 class="sidebar-mosts__item__title">Best Reverse Harem Anime List: 30 Popular Shows</h3>
</figcaption>
</figure>
</a>
</li>
<li class="sidebar-mosts__item ">
<a class="sidebar-mosts__item__link" href="https://rawisda.com/how-to/common-nicknames-for-marines-where-they-came-from-90655" title="Common Nicknames for Marines (+ Where They Came From)">
<figure class="sidebar-mosts__item__body">
<div class="sidebar-mosts__item__image">
<img class="sidebar-mosts__item__image__item lazyload"
src="https://rawisda.com/assets/images/preloader.gif"
data-src="https://cdn.rawisda.com/load/8025e59b316956895f7aef2bebb97492-s.jpg" alt="Common Nicknames for Marines (+ Where They Came From)"
width="300" height="169">
</div>
<figcaption class="sidebar-mosts__item__caption">
<div class="sidebar-mosts__item__view">
<span
class="sidebar-mosts__item__view__count">2</span>
<span class="sidebar-mosts__item__view__icon"><i
class="material-icons"></i></span>
</div>
<h3 class="sidebar-mosts__item__title">Common Nicknames for Marines (+ Where They Came From)</h3>
</figcaption>
</figure>
</a>
</li>
<li class="sidebar-mosts__item ">
<a class="sidebar-mosts__item__link" href="https://rawisda.com/how-to/how-to-clear-the-cache-on-a-ps5-console-for-better-performance-90654" title="How to Clear the Cache on a PS5 Console for Better Performance">
<figure class="sidebar-mosts__item__body">
<div class="sidebar-mosts__item__image">
<img class="sidebar-mosts__item__image__item lazyload"
src="https://rawisda.com/assets/images/preloader.gif"
data-src="https://cdn.rawisda.com/load/8025e59b316956895f7aef2bebb97492-s.jpg" alt="How to Clear the Cache on a PS5 Console for Better Performance"
width="300" height="169">
</div>
<figcaption class="sidebar-mosts__item__caption">
<div class="sidebar-mosts__item__view">
<span
class="sidebar-mosts__item__view__count">2</span>
<span class="sidebar-mosts__item__view__icon"><i
class="material-icons"></i></span>
</div>
<h3 class="sidebar-mosts__item__title">How to Clear the Cache on a PS5 Console for Better Performance</h3>
</figcaption>
</figure>
</a>
</li>
<li class="sidebar-mosts__item ">
<a class="sidebar-mosts__item__link" href="https://rawisda.com/how-to/what-does-it-mean-to-molly-whop-someone-90653" title="What Does It Mean to "Molly Whop" Someone?">
<figure class="sidebar-mosts__item__body">
<div class="sidebar-mosts__item__image">
<img class="sidebar-mosts__item__image__item lazyload"
src="https://rawisda.com/assets/images/preloader.gif"
data-src="https://cdn.rawisda.com/load/8025e59b316956895f7aef2bebb97492-s.jpg" alt="What Does It Mean to "Molly Whop" Someone?"
width="300" height="169">
</div>
<figcaption class="sidebar-mosts__item__caption">
<div class="sidebar-mosts__item__view">
<span
class="sidebar-mosts__item__view__count">2</span>
<span class="sidebar-mosts__item__view__icon"><i
class="material-icons"></i></span>
</div>
<h3 class="sidebar-mosts__item__title">What Does It Mean to "Molly Whop" Someone?</h3>
</figcaption>
</figure>
</a>
</li>
<li class="sidebar-mosts__item ">
<a class="sidebar-mosts__item__link" href="https://rawisda.com/how-to/how-to-lace-lanvin-curb-sneakers-quick-easy-tutorial-90652" title="How to Lace Lanvin Curb Sneakers: Quick & Easy Tutorial">
<figure class="sidebar-mosts__item__body">
<div class="sidebar-mosts__item__image">
<img class="sidebar-mosts__item__image__item lazyload"
src="https://rawisda.com/assets/images/preloader.gif"
data-src="https://cdn.rawisda.com/news/46/2f/eb/462feb53a4fae3c252c0e6c9a71299d6-s.jpg" alt="How to Lace Lanvin Curb Sneakers: Quick & Easy Tutorial"
width="300" height="169">
</div>
<figcaption class="sidebar-mosts__item__caption">
<div class="sidebar-mosts__item__view">
<span
class="sidebar-mosts__item__view__count">2</span>
<span class="sidebar-mosts__item__view__icon"><i
class="material-icons"></i></span>
</div>
<h3 class="sidebar-mosts__item__title">How to Lace Lanvin Curb Sneakers: Quick & Easy Tutorial</h3>
</figcaption>
</figure>
</a>
</li>
<li class="sidebar-mosts__item ">
<a class="sidebar-mosts__item__link" href="https://rawisda.com/how-to/210-unique-nicknames-for-best-friends-duos-90650" title="210+ Unique Nicknames for Best Friends & Duos">
<figure class="sidebar-mosts__item__body">
<div class="sidebar-mosts__item__image">
<img class="sidebar-mosts__item__image__item lazyload"
src="https://rawisda.com/assets/images/preloader.gif"
data-src="https://cdn.rawisda.com/news/e0/c6/30/e0c6301c428da3b00c465935f47feb72-s.jpg" alt="210+ Unique Nicknames for Best Friends & Duos"
width="300" height="169">
</div>
<figcaption class="sidebar-mosts__item__caption">
<div class="sidebar-mosts__item__view">
<span
class="sidebar-mosts__item__view__count">2</span>
<span class="sidebar-mosts__item__view__icon"><i
class="material-icons"></i></span>
</div>
<h3 class="sidebar-mosts__item__title">210+ Unique Nicknames for Best Friends & Duos</h3>
</figcaption>
</figure>
</a>
</li>
<li class="sidebar-mosts__item ">
<a class="sidebar-mosts__item__link" href="https://rawisda.com/how-to/111-of-the-best-girl-names-that-mean-moon-90624" title="111 of the Best Girl Names that Mean Moon">
<figure class="sidebar-mosts__item__body">
<div class="sidebar-mosts__item__image">
<img class="sidebar-mosts__item__image__item lazyload"
src="https://rawisda.com/assets/images/preloader.gif"
data-src="https://cdn.rawisda.com/news/e3/c8/38/e3c83832b07f5f11ac5117687ca487db-s.jpg" alt="111 of the Best Girl Names that Mean Moon"
width="300" height="169">
</div>
<figcaption class="sidebar-mosts__item__caption">
<div class="sidebar-mosts__item__view">
<span
class="sidebar-mosts__item__view__count">2</span>
<span class="sidebar-mosts__item__view__icon"><i
class="material-icons"></i></span>
</div>
<h3 class="sidebar-mosts__item__title">111 of the Best Girl Names that Mean Moon</h3>
</figcaption>
</figure>
</a>
</li>
<li class="sidebar-mosts__item ">
<a class="sidebar-mosts__item__link" href="https://rawisda.com/how-to/135-hilarious-popsicle-stick-jokes-for-kids-90610" title="135+ Hilarious Popsicle Stick Jokes for Kids">
<figure class="sidebar-mosts__item__body">
<div class="sidebar-mosts__item__image">
<img class="sidebar-mosts__item__image__item lazyload"
src="https://rawisda.com/assets/images/preloader.gif"
data-src="https://cdn.rawisda.com/news/94/5c/f7/945cf70f1824114d8522b7195c0c1c84-s.jpg" alt="135+ Hilarious Popsicle Stick Jokes for Kids"
width="300" height="169">
</div>
<figcaption class="sidebar-mosts__item__caption">
<div class="sidebar-mosts__item__view">
<span
class="sidebar-mosts__item__view__count">2</span>
<span class="sidebar-mosts__item__view__icon"><i
class="material-icons"></i></span>
</div>
<h3 class="sidebar-mosts__item__title">135+ Hilarious Popsicle Stick Jokes for Kids</h3>
</figcaption>
</figure>
</a>
</li>
</ol>
</div>
<div class="sidebar-block clearfix">
<div class="colheader sea">
<h3 class="header-title">Connect With Community</h3>
</div>
<div class="social_links">
<a href="/index.xml" class="social-rss" target="_blank" rel="nofollow">
<img width="24px" height="24px" src="https://rawisda.com/assets/images/social_icons/rss.svg" alt="Subscribe to our RSS" />
<span>Subscribe to our RSS</span>
</a>
</div>
</div>
</div>
</div>
</div>
</div>
<span class="back-to-top hide-mobile"><i class="material-icons"></i></span>
<div class="clear"></div>
<footer class="footer-bottom category-dropdown_sec sec_cat3 clearfix clearfix">
<div class="container">
<img class="footer-site-logo" src="https://rawisda.com/upload/flogo.png" width="60px" alt="">
<div class="footer-left">
<div class="footer-menu clearfix">
<ul class="level_root ">
</ul>
</div>
<div class="footer-copyright clearfix">
Copyright © 2025 Rawisda. All rights reserved.
</div>
</div>
</div>
</footer>
<script>
var buzzy_base_url ="https://rawisda.com";
var buzzy_language ="en_US";
var buzzy_facebook_app ="";
</script>
<script src="https://rawisda.com/assets/js/manifest.js?v=4.9.1"></script>
<script src="https://rawisda.com/assets/js/vendor.js?v=4.9.1"></script>
<script src="https://rawisda.com/assets/js/app.min.js?v=4.9.1"></script>
<div id="auth-modal" class="modal auth-modal"></div>
<div id="fb-root"></div>
<div class="hide">
<input name="_requesttoken" id="requesttoken" type="hidden" value="l00D6Ww2DVYmlfVtDrRt4i0y1fWWOeHtNgXLqzvw" />
</div>
<script>
var CommentsVar = {
ajax: "https://rawisda.com/api/comments",
requestData: {
_token: "l00D6Ww2DVYmlfVtDrRt4i0y1fWWOeHtNgXLqzvw",
post_id: "78299",
},
lang: {
Success: "Success",
Error: "Error",
Ok: "OK",
Cancel: "Cancel",
Edit: "Edit",
EditComment: "Edit Comment",
Report: "Report",
ReportComment: "Report Comment",
ReportPlaceholder: "Tell us why you are reporting this comment",
WriteSomething: "You need to write something!",
},
settings: {
useUserTags: "1",
}
};
</script>
<script src="https://rawisda.com/assets/js/comments.js?v=4.9.1"></script>
<script>
if($(".news").length) {
$(".news").buzzAutoLoad({
item: ".news__item"
});
}
</script>
<script type="text/javascript" defer src="https://cdn.jsdelivr.net/npm/livcounter/counter.js"></script>
<script async src="https://platform.twitter.com/widgets.js" charset="utf-8"></script>
<script async defer src="//platform.instagram.com/en_US/embeds.js"></script>
</body>
</html>
|


tags use the src attribute, anchors use the name attribute, and links use the href attribute. See how those all follow the ___="___" format?


