
How to Sew a Circle Pillow

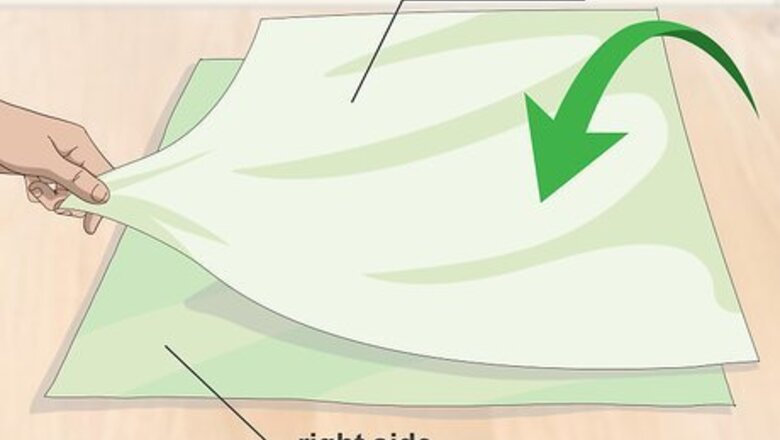
Place two pieces of fabric together with right sides facing in. Lay a fabric sheet on a flat surface with the right side facing you. The "right side" is the front or patterned side of the fabric, while the "wrong side" is the back or blank side. Place another sheet of fabric with the wrong side facing up, and ensure all edges are aligned. A standard circle throw pillow is 16 inches (41 cm) in diameter. However, you can make your pillow as big or small as you want. Choose woven fabric without any stretch, like linen or cotton broadcloth, so your pillow holds its shape over time. You can also use fabric from clothes you no longer wear, which is a great way to repurpose and recycle your items.
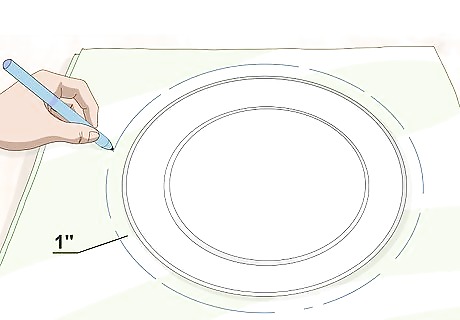
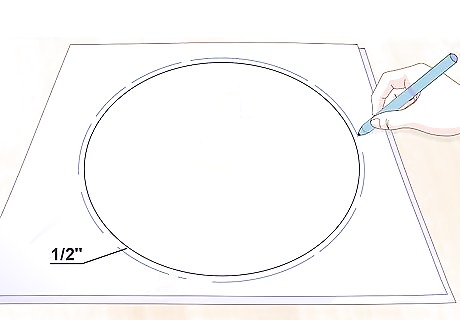
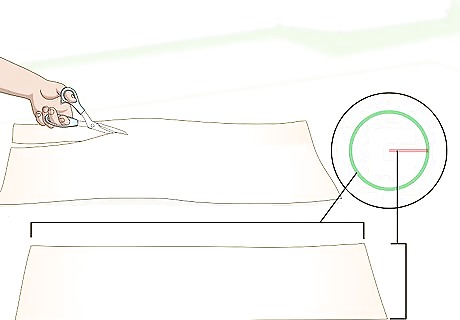
Use an erasable pen or chalk to trace a circle onto the fabric. Grab a large bowl or similar item to trace a circle onto your fabric. Add 1 to 2 inches (2.5 to 5.1 cm) to your circle's size for seam allowance and cutting. If you're making a cover for an existing pillow, trace ⁄2 inch (1.3 cm) around the pillow. You can also make a circle pattern by folding the fabric into quarters. Measure from the center and mark the length of half the diameter plus seam allowance. Repeat this and mark an arc, marking at regular intervals. Then, cut along the marked line. Use white tailor's chalk for dark fabrics or a fabric pen on light fabrics.

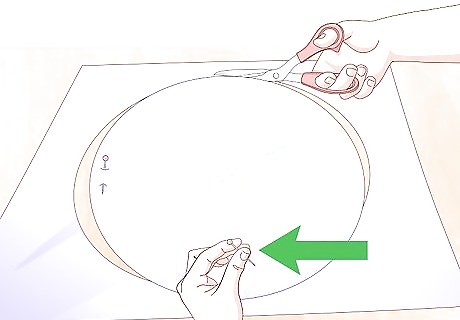
Pin the fabric together and cut the circle pattern out. Insert sewing pins through both layers of the fabric just below the template marks to hold it together. Use sharp fabric scissors and cut through both pieces using the template line as a guide. Don't remove the pins; they'll hold the fabric together as you sew. Alternatively, place a hardcover book or a similar heavy item to hold the fabric. Use a circular knife to cut the fabric out and then pin. You could also trace the circle on pattern paper and cut it out to make identical pillows in the future. If you're adding a zipper, cut one circle in half. Then, place the zipper face-down on one half-circle with the fabric right-side up. Line up the straight edge with the zipper and pin it. With a zipper foot on the machine, sew a straight stitch. Repeat with the other half-circle.

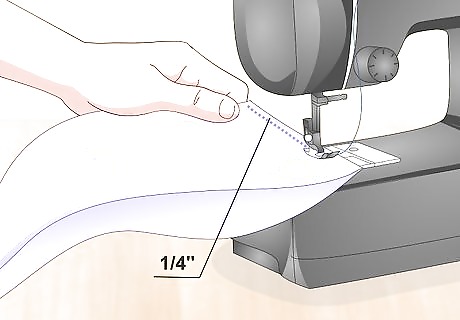
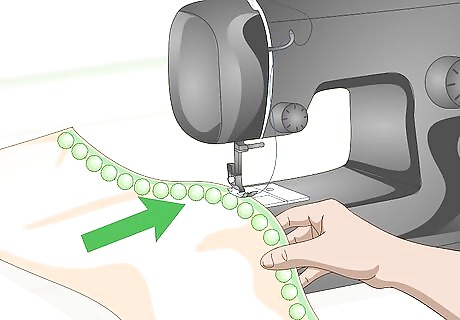
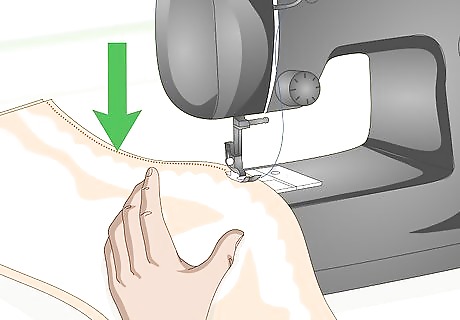
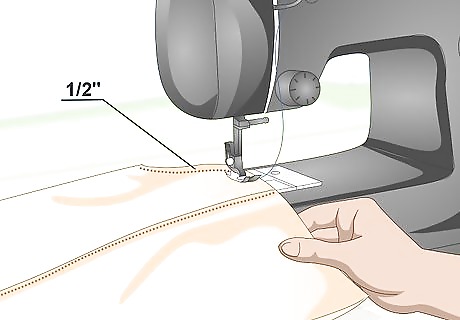
Sew around the circle partway using a ⁄2 in (1.3 cm) seam allowance. Thread your sewing machine with an all-purpose polyester thread that matches the color of your fabric. Select the "straight stitch" setting and begin with a backstitch to secure the stitches. Then, continue to sew along the edges of your pillow with a ⁄2 in (1.3 cm) seam allowance. Leave a 4 to 6 in (10 to 15 cm) gap to turn the pillow inside out. Remove the pins as you sew so you don't ruin your sewing machine. Alternatively, sew a straight stitch by hand. Bring the needle up from the bottom of the fabric and back through, making a straight stitch ⁄4 in (0.64 cm) long. Repeat this process.
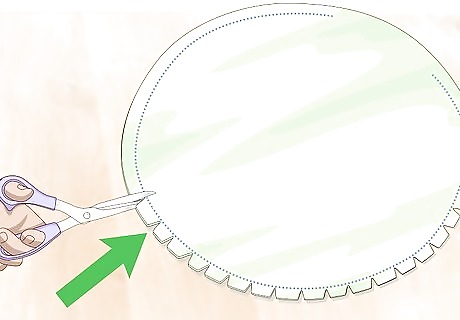
Cut notches into the seam allowance for a cleaner look. Use sharp fabric scissors to cut V-shaped notches into the seam. Make the notches approximately ⁄2 in (1.3 cm) apart and as close to the stitching as possible. This will prevent the fabric from buckling. Be careful not to cut through the stitching to avoid unraveling the thread.
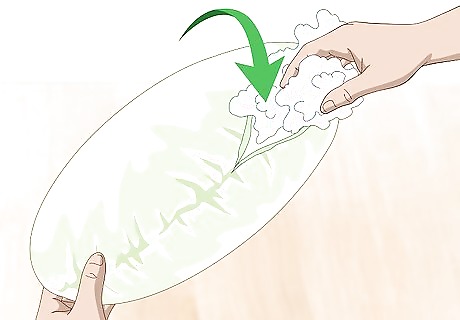
Turn the pillow inside out and stuff it with polyester fiberfill. Use the gap and your fingers to push the fabric inside out. Then, flatten out the seams with your fingers or a knitting needle. Grab a handful of polyester fiberfill and stuff it until you reach your desired firmness. Use foam stuffing, microbeads, or old clothes as a substitute for polyester stuffing.
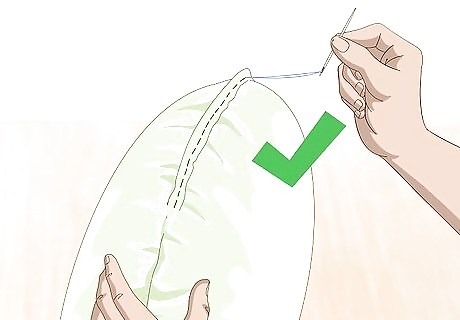
Sew the gap shut by hand with a ladder stitch. Fold the raw edges of the gap's opening to match the seams. Secure the opening with sewing pins and thread a needle. Use your fingers to pinch the folds together. Then, insert the needle through the right side of the fold. Make a 1cm stitch into the right inside fold and another stitch on the left inside fold. Alternate right and left stitches to make a ladder stitch. Tie a knot, trim the excess thread, and remove the pins afterward.
How to Make a Cushion Pillow
Trace a circle on two pieces of fabric with the wrong side facing out. Place a sheet of fabric with the right side facing you on a flat surface. Then, place a second sheet on top with the wrong side facing you. Use a large bowl or similar item to trace a circle with chalk onto the fabric, making a pattern template. If you're making a cover for an existing pillow, add ⁄2 inch (1.3 cm) around the pillow instead for seam allowance.
Pin the edges together and cut the circle out. Insert sewing pins inside the circle you drew, pinning through both layers of fabric. Then, cut along the drawn line with fabric scissors. Remove the sewing pins afterward to reveal two identical circles.
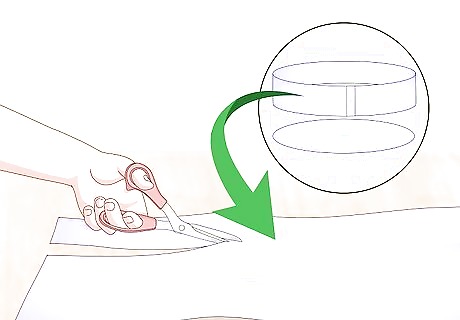
Cut a rectangular strip of fabric to wrap around the sides. Deciding how tall you want your pillow to be differs from the circle's circumference. The pillow’s side (the ring you’ll make) is the height. For instance, you may want your pillow to be an inch in height. Once you’ve decided, measure the circumference of the fabric circle you just cut out. Then, add ⁄2 inch (1.3 cm) for the rectangle's length. Cut a strip out of fabric based on these measurements for the pillow's sides. A standard width for a pillow 3 inches (7.6 cm). However, it can be as wide as you want. Use the same color or pattern as the circle or a similar one.
Sew the ends of the rectangular strip with a ⁄4 in (0.64 cm) seam allowance. Fold the strip in half with the right side facing in. Pin the fabric, if needed, then sew both ends with a straight stitch and matching thread. Always start and end with a backstitch to secure it. Leave ⁄4 in (0.64 cm) for the seam allowance. If you're using pins, remove them as you sew. Use a hot iron to lay the seams flat. This will give you a clean finish.
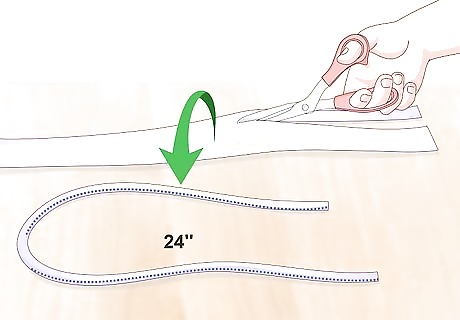
Cut two 24 in (61 cm) thin strips of bias tape for cushion ties, optional. If you want to secure your cushion to a chair with ties, cut two thin strips of fabric. Then, fold the ends by ⁄4 to ⁄2 inch (0.64 to 1.27 cm) and flatten it with an iron. Fold the bottom to the middle of the strip and iron. Repeat on the top. Fold the strip in half lengthwise and iron. Sew the edges to secure.

Fold and sew the cushion ties to one of the circles, optional. Fold the strips in half width-wise and pin the fold to the right side of the circle. Stitch over the pinned ties using a straight stitch, leaving ⁄4 in (0.64 cm) for seam allowance. Remove the pins when you’re done. How far apart you space the ties depends on how wide the backrest of your chair is. If you don’t want to use ties for your cushion, skip this step.

Pin and sew the rectangular strip to one of the circles. Ensure the right sides of the ring and circle are facing in so you can turn it inside out later. Use a ⁄4 in (0.64 cm) seam allowance and backstitch at the start and end of your sewing. Remove the pins as you sew.
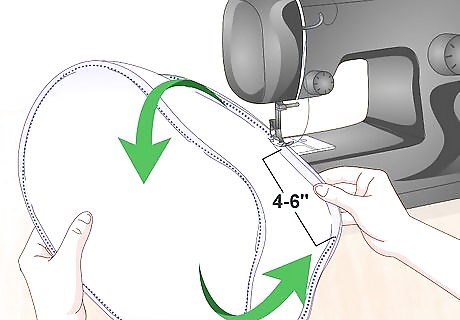
Sew the second circle on top, but leave a 4 in (10 cm) gap. Pin the second circle on top of the ring, ensuring the right side faces in. Sew around the circle again. However, this time, leave a 4 to 6 in (10 to 15 cm) gap between the start and end of your sewing for turning the pillow right-side-out.
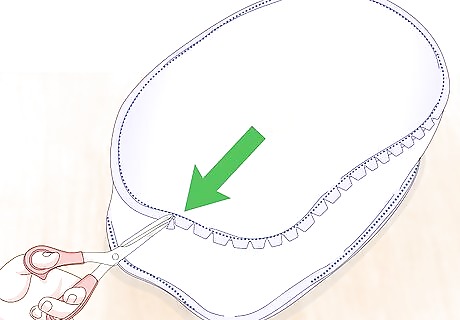
Cut V-shaped notches around the circle close to the stitching. Work one circle at a time as you cut V-shaped notices into the seams. Space the notches about ⁄2 inch (1.3 cm) apart. This will help reduce bulk when you turn the pillow right-side-out.
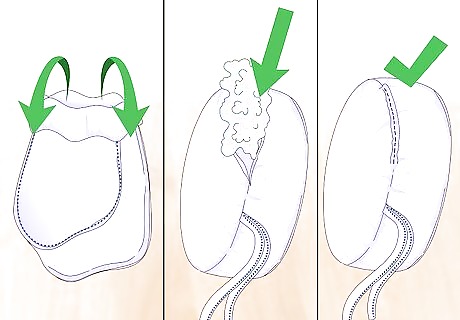
Turn the cushion inside out, stuff it, and close the gap by hand. Flip the pillow inside out with your hands. Use your finger or a knitting needle to push the seams, if necessary. Then, insert a pillow form or polyester fiberfill through the gap. Sew the gap shut using a ladder stitch by hand. If you added ties to the cushion, use it to secure the cushion to your chair.
How to Sew a Decorative Tufted Pillow
Cut two rectangles based on the measurements of your pillow. Decide how wide your pillow is, then divide it by 2 to get the radius. Calculate the circumference of a circle with an online calculator. Then, use scissors to cut two rectangles out from the fabric. These will be used to form a pillow at the end. Use the radius for the rectangle's height and the circumference for the length. Round the circumference up or down to the nearest whole number to make measuring easier. If you wish to add a trim to your pillow, cut it according to the circumference. Great trims include fringe, mini pompoms, rickrack, lace, and beads.
Baste the trim to the right side of one rectangle, optional. Match the edge of the trim to one of the long edges of your rectangle. Ensure the trim is on the right side of the fabric and the decorated part is facing inward. Basting is a temporary stitch that holds the fabric in place. You can use basting tape, pins, or loose ⁄4 in (0.64 cm) straight stitches.
Stack the rectangles together, then sew along the trimmed edge. Pin the rectangles together with the right sides facing in. Sew along the side you added the trim to. Use a straight stitch, a ⁄2 in (1.3 cm) seam allowance, and matching thread color. Backstitch when you start and finish sewing, and remove the pins as you go. Use a zipper foot if your fringe is bulky.
Sew the narrow ends together with the right sides facing in. Open up your sewn rectangles like a card or a book. Bring the narrow ends together so that the right sides touch. Sew the narrow ends together using a ⁄2 in (1.3 cm) seam allowance.
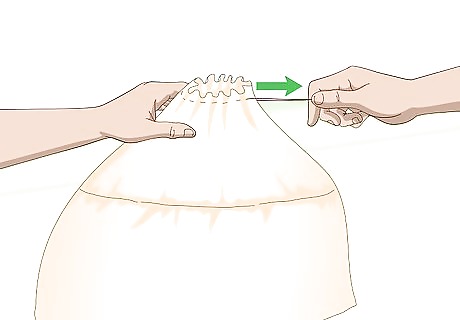
Gather the top edge of your fabric ring by hand. Starting at the side seam, sew a running stitch along the top edge using a ⁄2 in (1.3 cm) seam allowance. When you reach the side seam again, pull on the thread to gather the fabric into a smaller ring. Knot the thread securely, then snip the excess off. For extra durability, use a strong, upholstery thread. Knot the ends together to sew with a double rather than a single strand. The longer you make your stitches, the smaller the ring will be. The exact size of the ring does not matter as long as it's smaller than the button you'll be making.

Turn the pillow right-side out, stuff it, then gather the other edge. Turn the pillow right-side out first. Insert a pillow form through the un-gathered end. Close the un-gathered end using the same technique as in the previous step: sew along the edge using a running stitch, then pull on the thread to gather the fabric.

Create two large covered buttons using a kit. Purchase a cover button-making kit in the largest size you can find. Cut two circles out of fabric larger than the buttons, then assemble them according to the kit's instructions. You can use the same color of fabric as your pillow fabric, or you can match them to the trim instead.
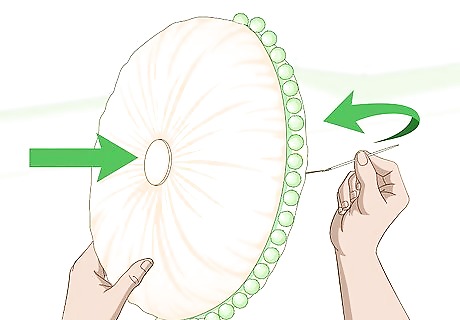
Sew one fabric-covered button onto the back of the pillow. Thread a long needle with a strong thread. Push it through the front of your pillow and out the back, leaving an 8 in (20 cm) tail. Thread the needle through your first button, then push it back through the pillow. Tie the ends of the thread into a tight knot. The tighter you tie the knot, the more tufted your pillow will look.
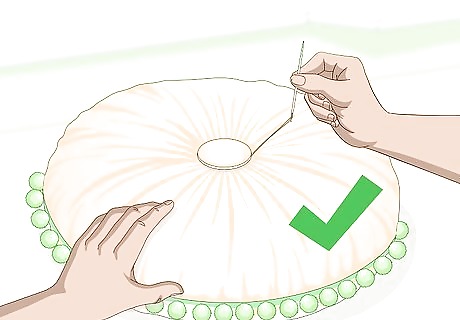
Sew on the second button. Thread the second button onto the needle. Push the needle through the front of the pillow and out the back. Bring the needle through the first button. Push the needle through the back of the pillow and out the front. Bring it through the second button again, then tie it to the tail from before. Snip off the excess thread.


Comments
0 comment